Webhook publishing
On this page
- Set up the webhook
- 1. Open the section's Publishing settings
- 2. Pick Webhook and enter your URL
- 3. Add a Bearer token
- 4. Save, then test the connection
- The request
- Events
- The payload
- What your endpoint returns
- Failures and retries
- Example receiver
- Common questions
- Does Quillly sign the payload?
- Is there an event for unpublishing?
- How do I tell a docs page from a blog post?
- Related
A webhook sends each item in a section to a URL you control, as JSON, when the item is published, changed, unpublished or deleted. Use it to feed a custom CMS, a static site build or an automation tool such as Zapier.
Before you start, you need:
A section in Quillly, such as Blog. See Content types and URLs.
An HTTPS endpoint that accepts a
POSTwith a JSON body and answers within 15 seconds.
Set up the webhook#
Open the section's Publishing settings#
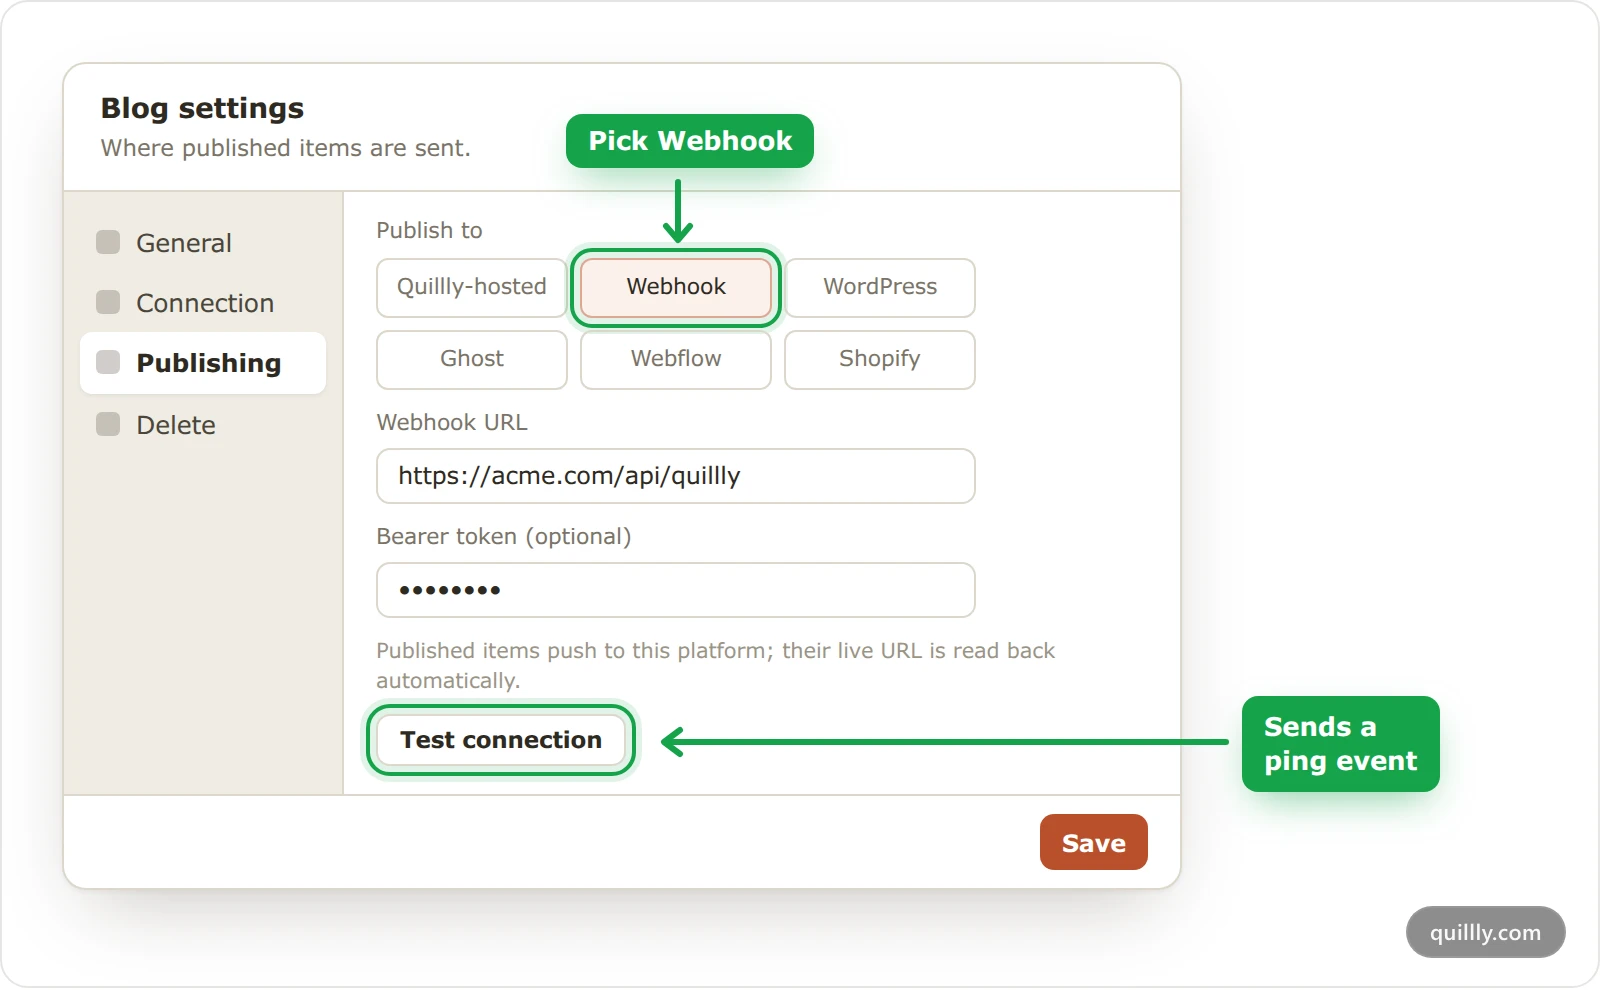
Under Content, open the section, such as Blog. Click the gear icon at the top of the section, then Publishing.
Pick Webhook and enter your URL#
Under Publish to, click Webhook. Enter your endpoint in Webhook URL, such as
https://acme.com/api/quillly.Add a Bearer token#
In Bearer token (optional), enter a long random string that your endpoint also knows. Quillly then sends it on every request in the Authorization header, as
Authorization: Bearer <token>, and your endpoint can refuse requests without it. The token is optional, but without it anyone who finds the URL can post to it.Save, then test the connection#
Click Save. Open the gear icon again, go to Publishing, and click Test connection. Quillly sends a
pingevent, and any2xxanswer passes with Webhook responded HTTP 200.If you picked Your existing platform when you added the website, the Connect your platform screen offers Webhook for your Blog with the same two fields.
The request#
Quillly sends every event the same way:
Method:
POSTto your Webhook URL.Headers:
Content-Type: application/json, plusAuthorization: Bearer <token>when you set a token.Body: a JSON object with
event,siteand, except forping,item.Timeout: 15 seconds for content events, 10 seconds for
ping.
Events#
| When Quillly sends it |
|
|---|---|---|
| An item in the section goes live, and Quillly has no |
|
| A change is saved to a published item that has an |
|
| An item with an |
|
| An item with an |
|
| You click Test connection. There's no | none |
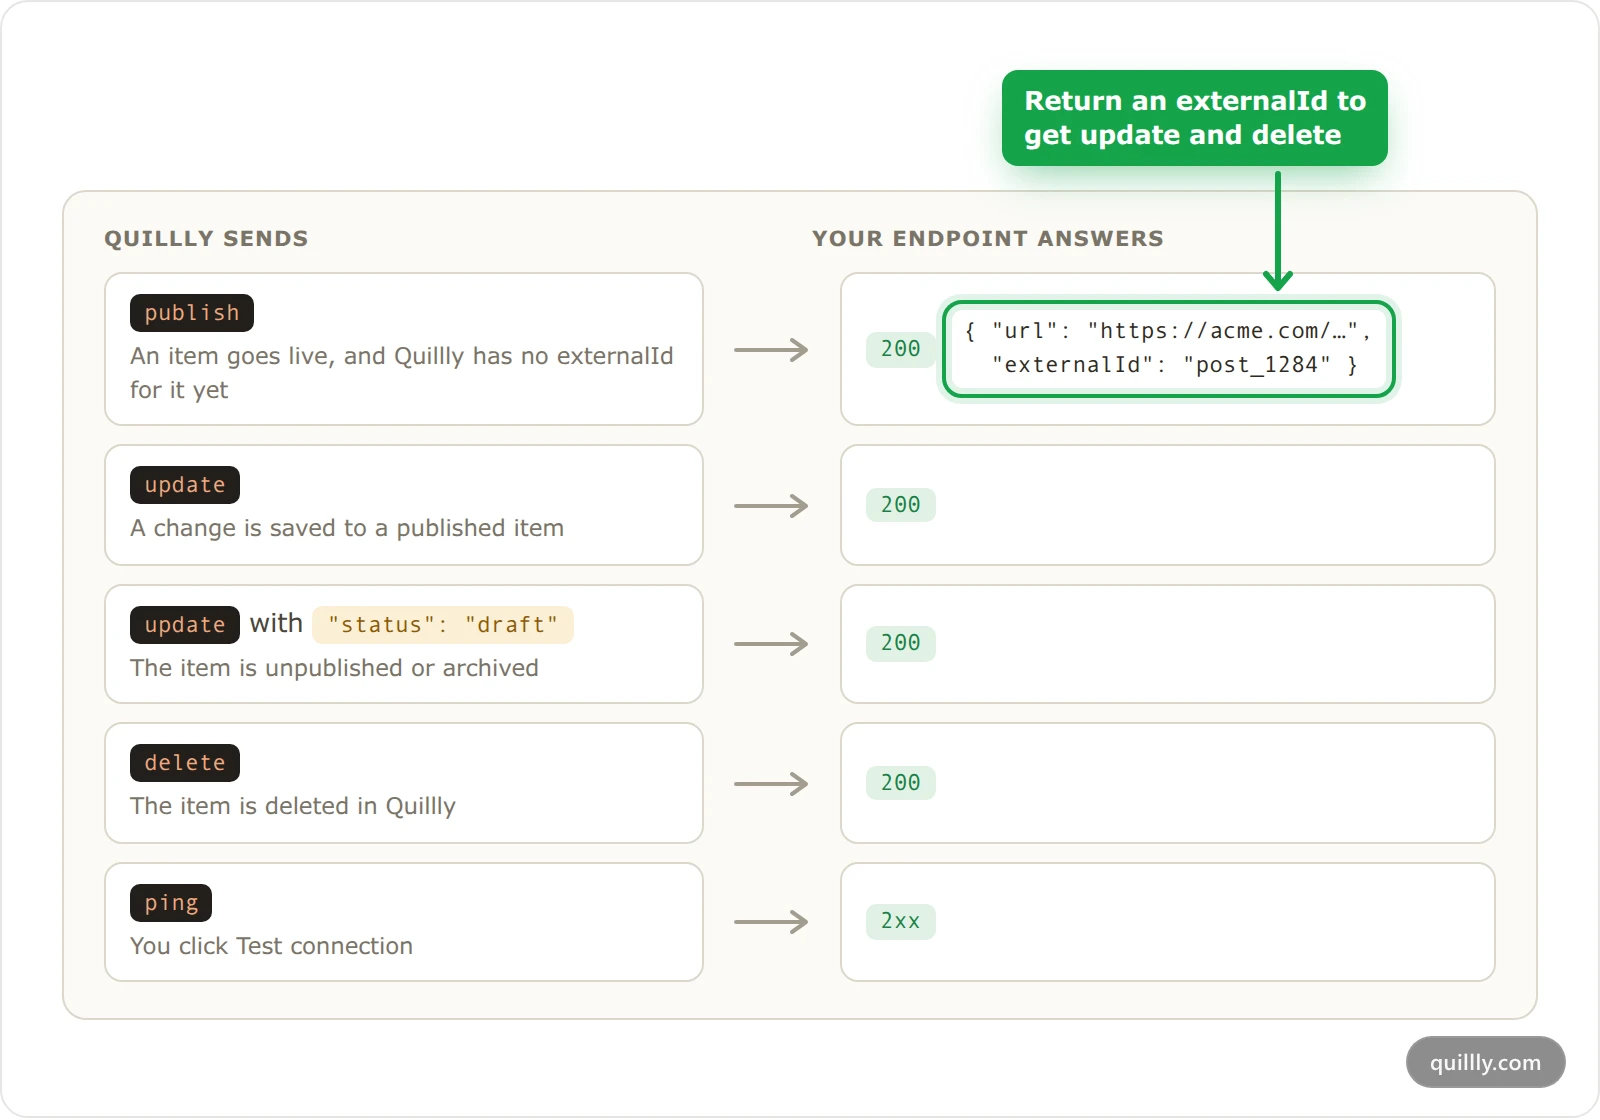
The externalId is the ID your endpoint returns for the item, as the next sections show. Until Quillly has one, every change to a published item arrives as another publish, and unpublishing or deleting the item sends nothing.
The payload#
This is an update event, built by Quillly's own code with sample data:
{
  "event": "update",
  "site": {
    "websiteId": "0196f1c2-3b4d-7e8f-a1b2-c3d4e5f60718",
    "domain": "acme.com"
  },
  "item": {
    "id": "0196f2a4-7c1e-7b52-9d3a-2f8e6c41a0b7",
    "externalId": "post_1284",
    "title": "Choosing trail running shoes",
    "slug": "choosing-trail-shoes",
    "html": "<h2 id=\"heading-0-fit-comes-first\">Fit comes first</h2><p>Try shoes on in the <strong>afternoon</strong>, when your feet are largest.</p>",
    "markdown": "## Fit comes first\n\nTry shoes on in the **afternoon**, when your feet are largest.",
    "excerpt": "How to pick trail shoes that fit, grip and last.",
    "featuredImageUrl": "https://acme.com/images/trail-shoes.jpg",
    "status": "published",
    "metaTitle": "Choosing Trail Running Shoes: Fit, Grip and Wear",
    "metaDescription": "How to pick trail shoes that fit, grip and last.",
    "tags": ["trail running shoes", "running gear"]
  }
}Field | What it holds |
|---|---|
|
|
| Your website's ID in Quillly. |
| Your website's domain, such as |
| The item's ID in Quillly. It never changes, even when the slug does. |
| The ID your endpoint returned earlier. Missing on the first |
| The item's title and its current slug. |
| The body as HTML, the way Quillly renders it, without the title. |
| The same body as Markdown. |
| The item's excerpt, or its meta description when it has no excerpt. |
| The featured image's URL. |
|
|
| The SEO title and meta description. |
| The item's target keywords. |
Fields without a value are left out, so check for them before you use them. A delete event carries only id, externalId, title, slug, status and an empty html and markdown. The payload doesn't name the section, so give each section its own URL if one endpoint serves several.
What your endpoint returns#
Answer with any 2xx status code to accept the event. Anything else counts as a failure.
For publish and update, you can also return JSON with two optional fields:
{
  "url": "https://acme.com/blog/choosing-trail-shoes",
  "externalId": "post_1284"
}urlbecomes the item's live address in Quillly.externalIdis stored with the item and sent back with every later event for it. Use your own ID, or return Quillly'sitem.id.
Warning
Return an externalId on the first publish. Without one, Quillly can't tell your endpoint when the item is unpublished or deleted, and every change arrives as a new publish.
Failures and retries#
Quillly sends each event once. If your endpoint times out or answers with an error, nothing is retried, the item stays published in Quillly, and the dashboard shows no error. The next change you save to the item sends it again. Keep a log on your side, and run Test connection after you change the URL or the token.
Example receiver#
This Express server checks the token, then writes each item to a Markdown file named after Quillly's ID, so a changed slug still finds the same file. It returns that ID as the externalId, so update and delete events arrive.
import express from 'express';
import { mkdir, writeFile, rm } from 'node:fs/promises';
import path from 'node:path';

const TOKEN = process.env.QUILLLY_WEBHOOK_TOKEN;
const DIR = path.resolve('content/blog');

const app = express();
// Posts carry both HTML and Markdown, so allow a large body.
app.use(express.json({ limit: '5mb' }));

app.post('/api/quillly', async (req, res) => {
  if (!TOKEN || req.get('authorization') !== `Bearer ${TOKEN}`) {
    return res.status(401).json({ error: 'unauthorized' });
  }

  const { event, item } = req.body;
  if (event === 'ping') return res.json({ ok: true });

  const id = String(item.id).replace(/[^\w-]/g, '');
  const file = path.join(DIR, `${id}.md`);

  if (event === 'delete') {
    await rm(file, { force: true });
    return res.json({ ok: true });
  }

  // publish and update: write the latest version.
  // status is "draft" when the item was unpublished or archived.
  await mkdir(DIR, { recursive: true });
  const frontMatter = [
    '---',
    `title: ${JSON.stringify(item.title)}`,
    `slug: ${item.slug}`,
    `status: ${item.status}`,
    `description: ${JSON.stringify(item.metaDescription ?? '')}`,
    '---',
  ].join('\n');
  await writeFile(file, `${frontMatter}\n\n${item.markdown}\n`);

  return res.json({
    url: `https://acme.com/blog/${item.slug}`,
    externalId: id,
  });
});

app.listen(3000);
Answer quickly. If your build takes longer than 15 seconds, save the item, answer 200, and build afterwards.
Note
Quillly doesn't show a saved Bearer token again. If you later save any other change in this section's settings, enter the token again first, or Quillly clears it and stops sending the Authorization header.
Common questions#
Does Quillly sign the payload?#
No. The Bearer token is the only proof that a request came from Quillly, so use a long random token and an HTTPS URL.
Is there an event for unpublishing?#
No. Unpublishing or archiving an item sends update with item.status set to draft, as long as the item has an externalId.
How do I tell a docs page from a blog post?#
The payload doesn't say which section an item came from. Give each section its own webhook URL, such as /api/quillly/blog and /api/quillly/docs.
Related#
Publish into WordPress, Ghost, Webflow or Shopify: the same settings for a platform Quillly supports directly.
Content types and URLs: the five content types and where each one lives.
Add a website: the three ways to set up a site, including your existing platform.