Getting started with Quillly
On this page
- Set up your site
- 1. Sign in with Google
- 2. Answer a few questions
- 3. Choose how to set up your site
- 4. Claim a subdomain or add your domain
- 5. Verify your domain or connect your platform
- 6. Connect your AI
- 7. Publish your first post
- Your trial
- Common questions about getting started with Quillly
- Can I change my website's domain later?
- What if I already used a free trial?
- Do I have to connect Search Console?
- Related
This guide to getting started with Quillly takes you from signing in to your first published post. At the end you have a website in Quillly, your AI connected, and your first post live.
Before you start, have these ready:
A Google account. Quillly signs you in with Google only.
A name for your site. Either a Quillly subdomain such as
acme.quillly.com, or a domain you own such asacme.com.For your own domain: access to the Google Search Console or Bing Webmaster Tools account where that domain is already verified.
An AI app that supports MCP, such as Claude, ChatGPT or Cursor. This is optional: you can also write in Quillly's editor.
You do not need a card. The trial starts on its own when you create your first website.
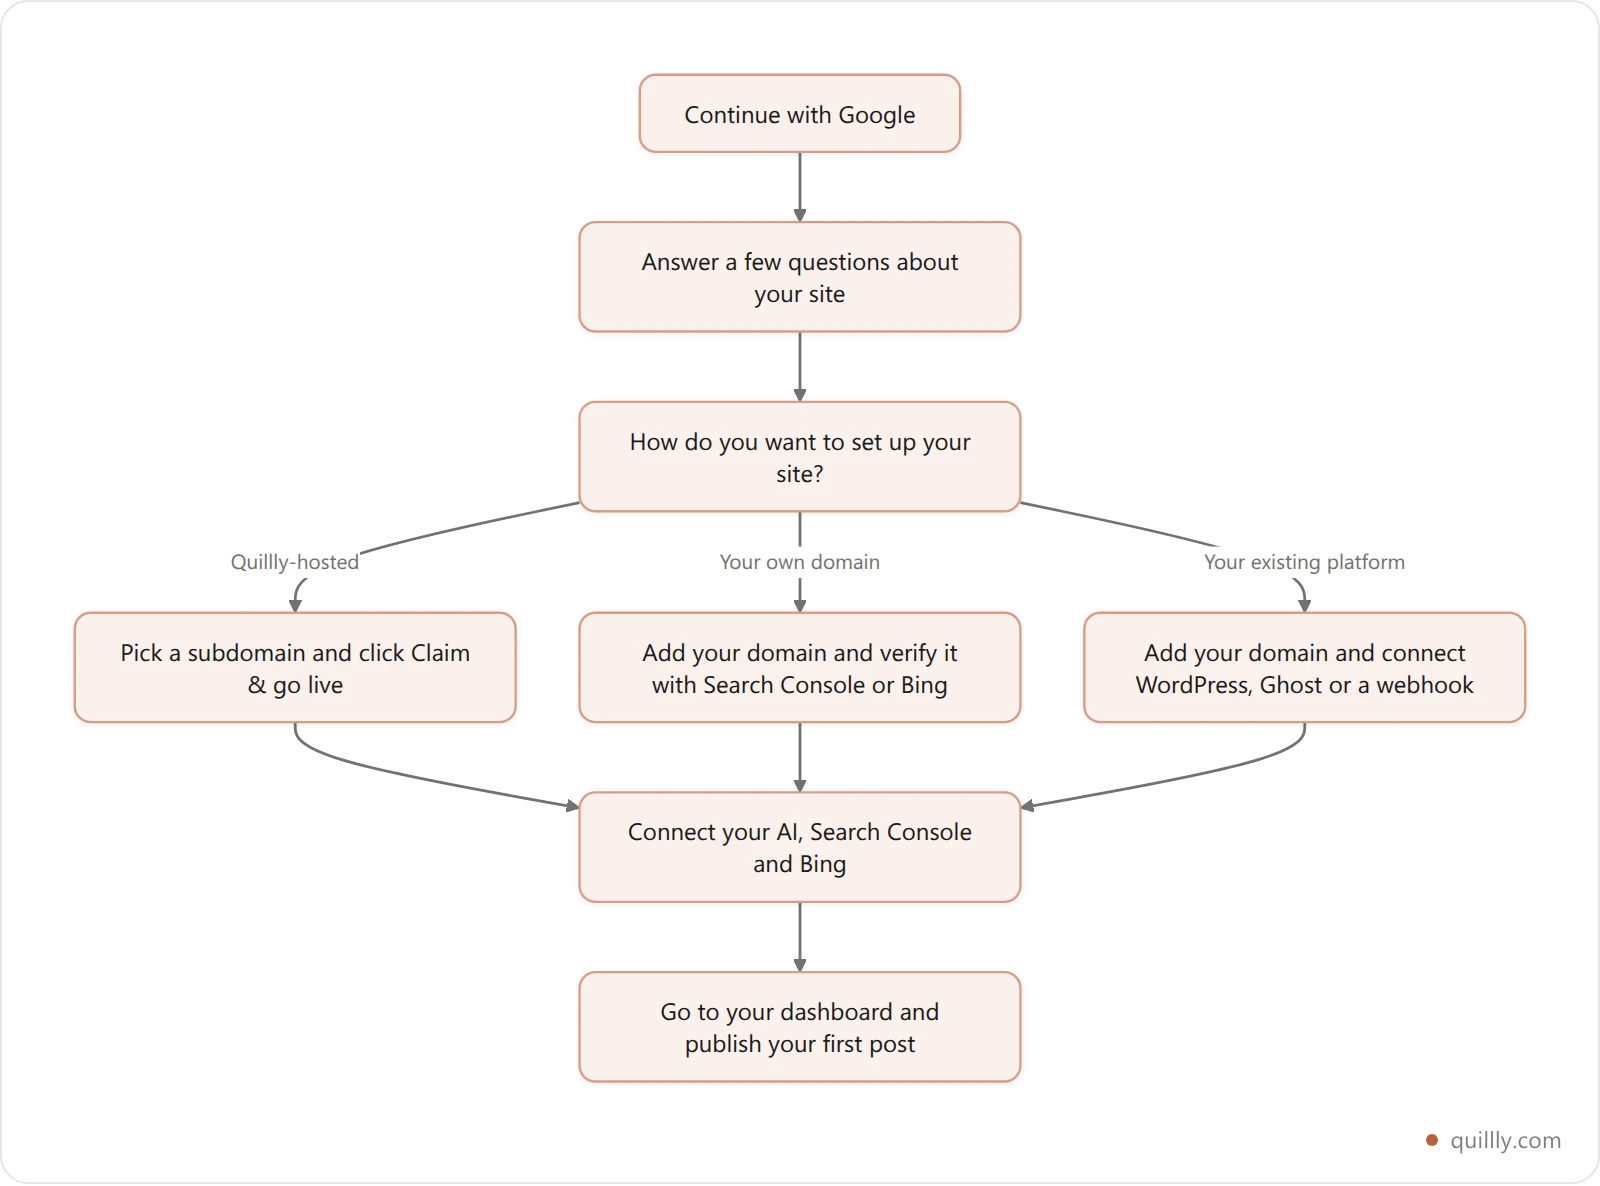
Set up your site#
Onboarding runs at quillly.com/onboarding and saves every step, so you can close the tab and continue later.
Sign in with Google#
Go to the Quillly sign-in page and click Continue with Google. A new account goes straight to onboarding.
Answer a few questions#
Onboarding opens with four short screens that ask about:
Your company or project (optional).
What you want to do with Quillly (Publish content, Rank & track pages or Both) and what kind of site it is.
How much you publish, and which AI tools you use.
What matters most to you.
Click Get started on the last screen, then Let's go.
Quillly uses your answers to tailor your starter post and the setup screens. You answer them only once.
Choose how to set up your site#
The next screen asks How do you want to set up your site? Pick one of three options:
TableOption
Where your posts appear
What you do next
Quillly-hosted
acme.quillly.com, hosted by QuilllyPick a subdomain
Your own domain
acme.com, under a path such as/blogProve you own the domain
Your existing platform
Your WordPress, Ghost or other site
Connect that platform
Quillly-hosted is the fastest way to a live post. You can move a Quillly subdomain to your own domain later.
Claim a subdomain or add your domain#
Quillly-hosted: type a subdomain of 3 to 30 characters, using letters, numbers and hyphens. When the screen says the name is available, click Claim & go live. Quillly creates the site, publishes a starter post and opens the live screen.
Your own domain or Your existing platform: type your domain, for example
acme.com, and click Continue.
Creating your first website starts your 14-day trial of the Pro plan.
Verify your domain or connect your platform#
On your own domain, the screen Verify you own acme.com appears. Click Connect Google Search Console or Connect Bing Webmaster and sign in with the account where the domain is verified. Quillly checks that the verified property matches your domain, then takes you to the live screen, which says You're verified.
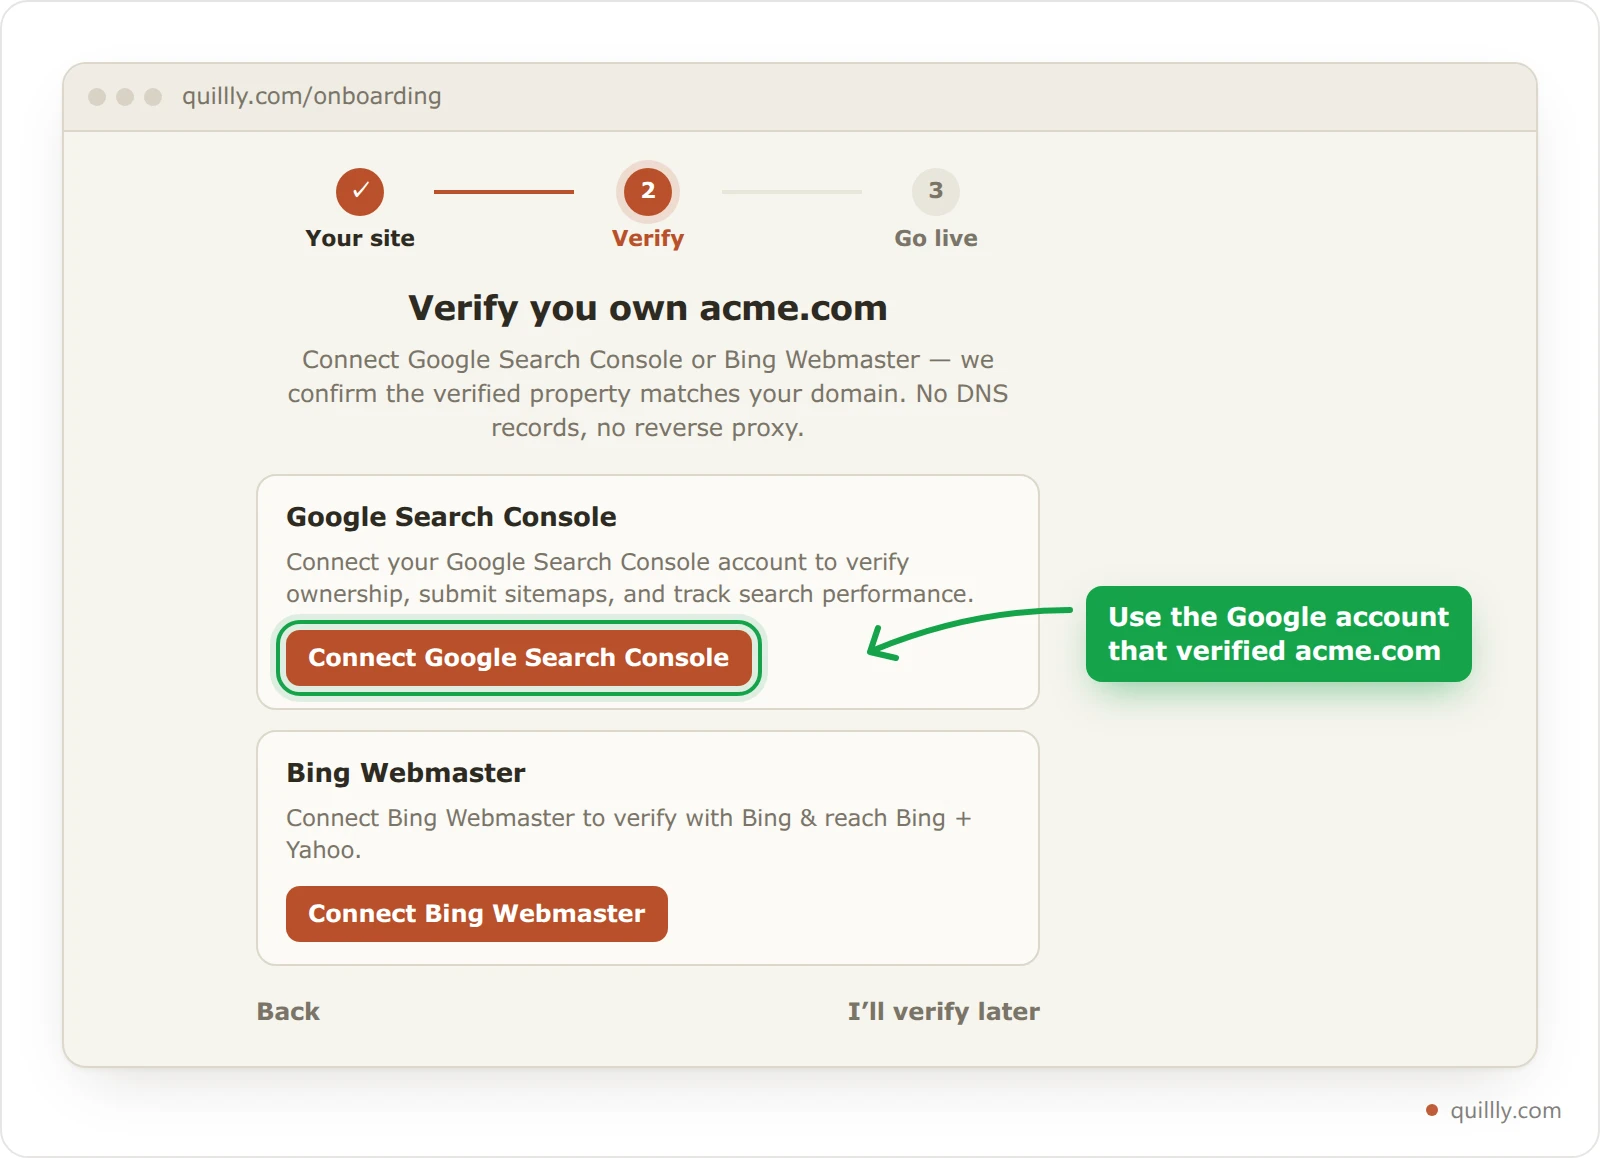
This step needs no DNS record, no meta tag and no reverse proxy. If Search Console does not have the domain verified yet, the panel then offers Google's own methods, such as HTML Meta Tag or DNS TXT Record, with a Verify Ownership button. You can also click I’ll verify later, but indexing, ranking and tracking stay locked until you verify.
On your existing platform, the screen Connect your platform appears instead. Choose WordPress (site URL, username and application password), Ghost (site URL and Admin API key) or Webhook (your endpoint URL), then click Connect & continue. You can also skip this and set it up later from the Content menu.
Connect your AI#
The live screen lists three optional connections under Make it even better. Click Connect next to Connect your AI assistant.
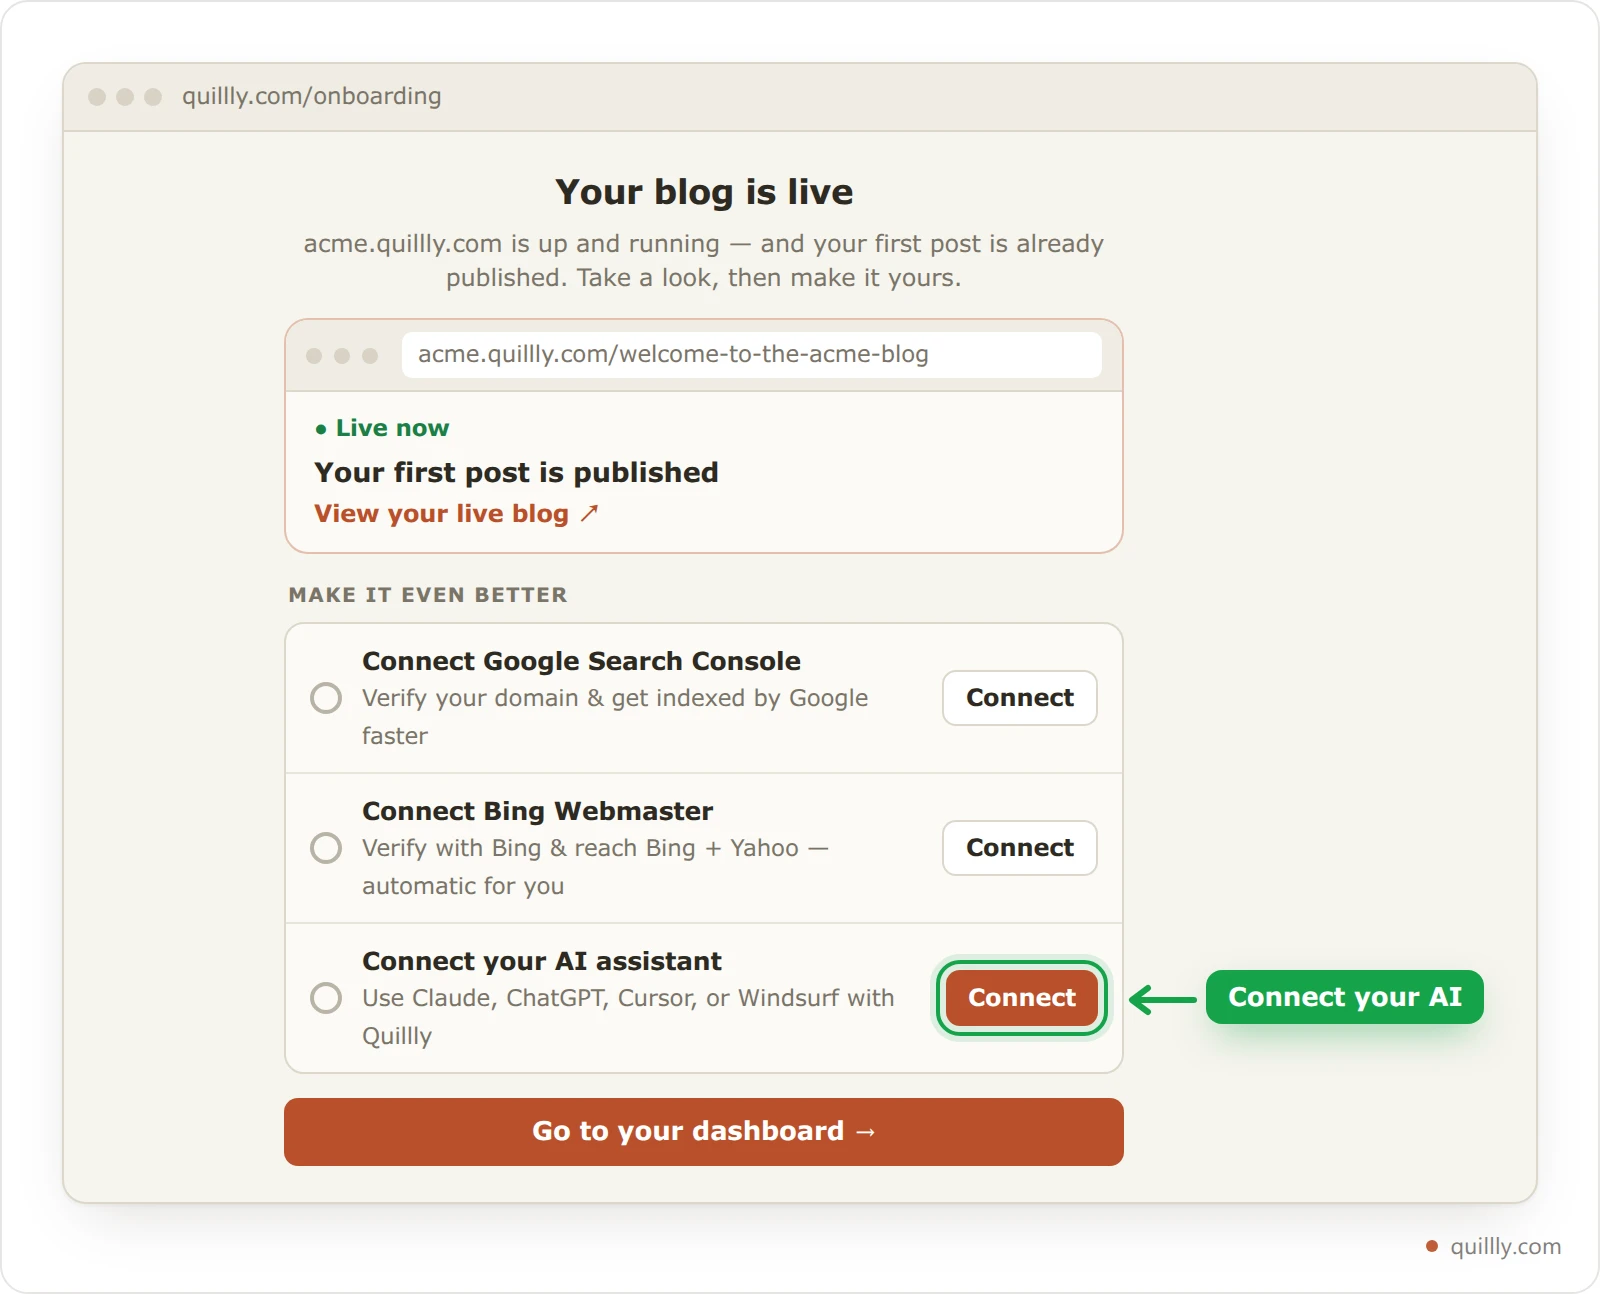
Pick your app: Claude, ChatGPT, Cursor, Windsurf or Other / CLI.
Copy the connection link Quillly prepares, add it to your app as the screen shows, and click I've added it.
In your app, send the test message
List my Quillly websites. The screen turns green as soon as Quillly sees the call.
Warning
The connection link contains your API key. Anyone who has it can act on your Quillly account, so do not paste it anywhere public. You can revoke it under Connections.
The other two rows connect Google Search Console and Bing Webmaster, so Quillly can submit your sitemap to them and show you how your pages rank. When you are done, click Go to your dashboard, which opens your Blog.
Publish your first post#
On a Quillly subdomain, your starter post is already live. Edit it or replace it with your own.
On your own domain, your pages appear once you connect the blog to your server with a reverse proxy. Quillly gives you a ready snippet for Nginx, Caddy, Apache, Next.js, Vercel, Netlify, Cloudflare Workers or PHP hosting, plus a Verify Connection button to check it. The default path is
/blog.On your existing platform, publishing in Quillly sends the post to WordPress, Ghost or your webhook.
Then ask your AI to write one. For example: "Write a short post for acme.com about choosing running shoes, check its SEO score, fix what it flags, and publish it." The AI saves a draft, scores it and publishes it. When your AI publishes, Quillly refuses any post that scores below your site's minimum, which is 85 unless you change it. Prefer to write yourself? Open Blog and click New Post.
When Quillly serves the post, publishing updates your sitemap and notifies eight search engines: Google through Search Console once you connect it, and Bing, Yahoo, Yandex, Naver, Seznam, Yep and Amazon through IndexNow.
Your trial#
Length: 14 days of Pro, with no card. There is one trial per email address, ever.
What is different: you get 20 research credits instead of Pro's 100, and you cannot top up credits until you subscribe.
When it ends: most of the dashboard locks (Billing stays open) and your AI can no longer publish. Your published pages keep working for 7 days, then pause until you subscribe.
Prices, credits and API limits for every plan are in Plans, trial and limits.
Common questions about getting started with Quillly#
Can I change my website's domain later?#
Not in place: a website's domain is fixed once you create it. Add a new website with the new domain, then open the old website's settings and use Redirect to move your posts and forward the old URLs to the new site.
What if I already used a free trial?#
Onboarding still sets up your site, but it ends on the plans screen instead of the dashboard. There is one trial per email address, even if you delete your account and sign up again.
Do I have to connect Search Console?#
Only to verify your own domain, and Bing Webmaster works for that too. On a Quillly subdomain it is optional, but it lets Google learn about new posts from your sitemap as soon as you publish.
Related#
What is Quillly: the three products and what runs where.
Plans, trial and limits: prices, the trial and what happens when it ends.
Connect Claude, ChatGPT or Cursor: the setup in each app.
Content types & endpoints: blog, docs, changelog and their paths.
How Quillly scores your content: what the score checks and how to raise it.