Prove you own your domain
On this page
- What counts as proof
- Prove you own your domain
- 1. Open the verify step
- 2. Connect Search Console or Bing
- 3. Check the result
- If the property is missing or not verified
- 1. Pick a method
- 2. Get the token
- 3. Place it and verify
- If connecting fails
- Verify later
- Common questions
- Do I need to add a DNS record?
- Do I need both Search Console and Bing?
- Does verifying put my blog on my domain?
- Related
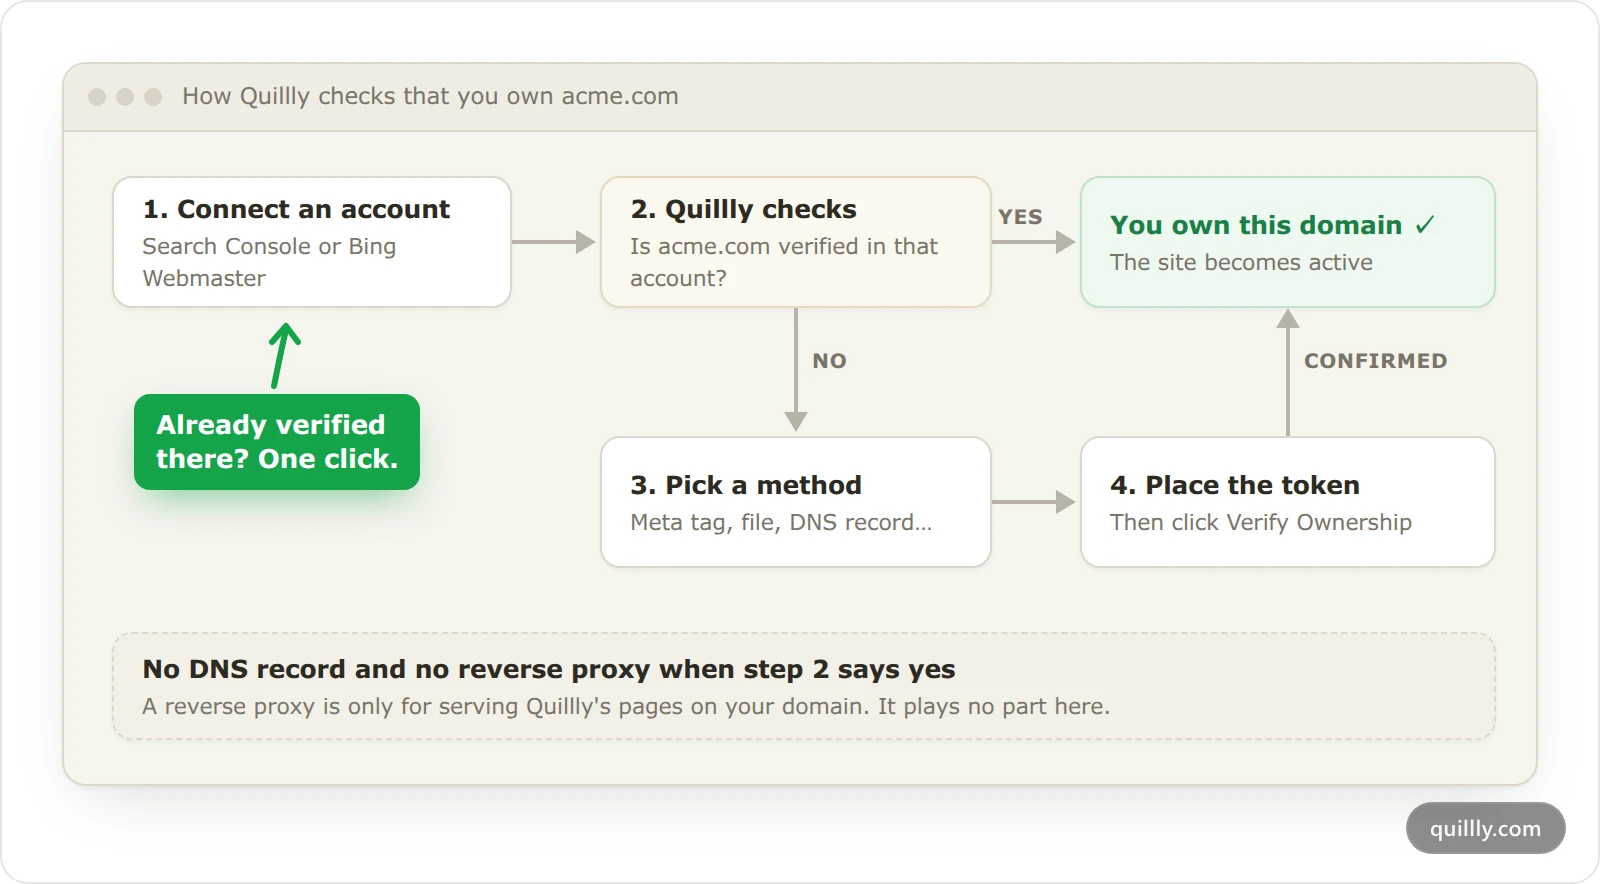
To use Quillly on a domain you own, you first prove you own your domain by connecting Google Search Console or Bing Webmaster Tools. If the domain is already verified there, it takes one click, with no DNS records and no reverse proxy.
Before you start, you need:
A website on your own domain in Quillly. If you haven't added it yet, see Add a website.
An account that has the domain: Google Search Console or Bing Webmaster Tools. If the domain isn't verified there yet, you'll verify it as part of these steps.
Quillly subdomains, such as acme.quillly.com, skip all of this: Quillly verifies them when you claim them.
What counts as proof#
Connecting one account is enough. Quillly then looks in that account for your domain:
Google Search Console: a verified Domain property for
acme.com, or a verified URL-prefix property forhttps://acme.com/. A URL-prefix property for thewwwaddress alone doesn't count, so if that's all you have, use the domain verification methods below or connect Bing.Bing Webmaster Tools: your site, verified, at either
acme.comorwww.acme.com.
If your domain isn't in the account yet, Quillly adds it for you. In Search Console it adds a Domain property when Google allows it, and a URL-prefix property otherwise. You then verify it from the same screen.
Domain verification doesn't put anything on your domain. Serving Quillly's pages at a path such as acme.com/blog is a separate step, done with a reverse proxy.
Prove you own your domain#
Open the verify step#
Right after you add your domain, onboarding shows Verify you own acme.com. If you left it for later, open Websites, find the site under Drafts and click Continue Setup.
Connect Search Console or Bing#
Click Connect Google Search Console or Connect Bing Webmaster. Sign in with the account that has your domain and allow access.
Check the result#
You come back to onboarding. If that account already had your domain verified, you land on the last screen, which reads You're verified and shows Domain verified.
If you land on Verify you own acme.com again, and the panel shows Needs Verification or Action needed, the account doesn't have a verified property for your domain yet. Verify it with the steps in the next section.
If the property is missing or not verified#
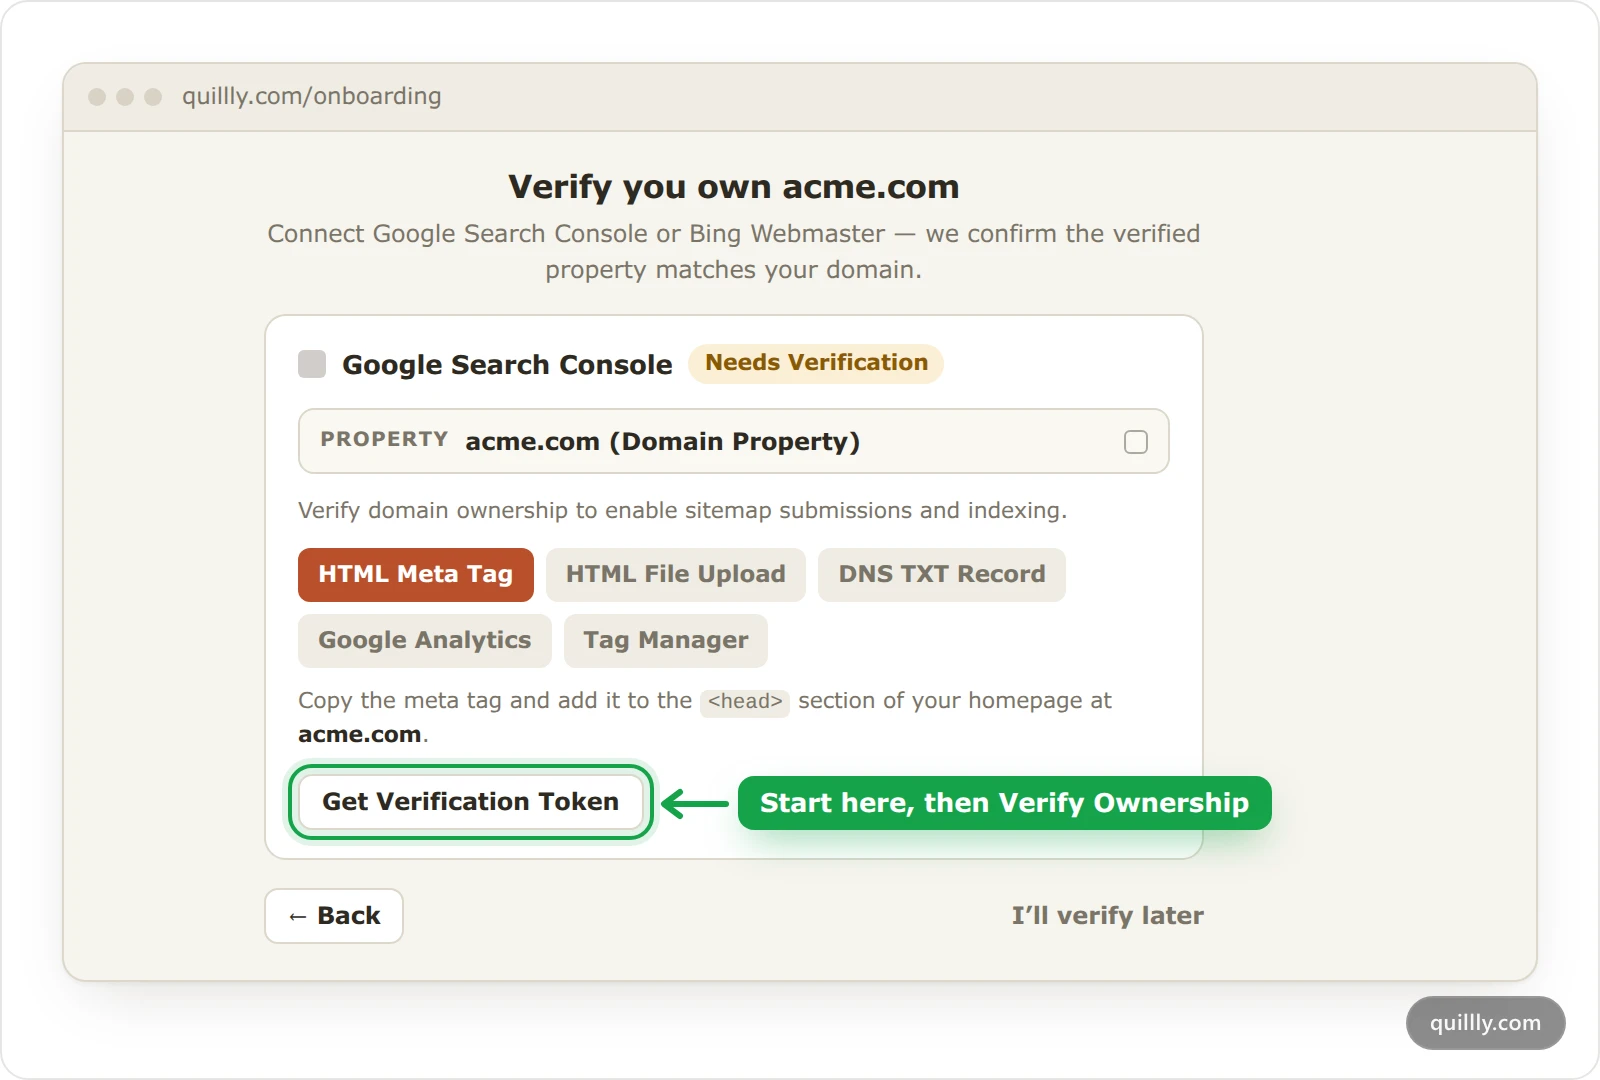
The Google Search Console panel then lists Google's own verification methods. Pick the one you can do, place the token, and let Google check it.
Pick a method#
TableMethod
Where the token goes
HTML Meta Tag
In the
<head>of your homepage atacme.com.HTML File Upload
A file at the root of
https://acme.com/.DNS TXT Record
A TXT record at your domain registrar. DNS changes can take a few minutes.
Google Analytics
Uses the Google Analytics code already on your homepage. It must belong to the same Google account.
Tag Manager
Uses the Tag Manager container already on your homepage, from the same Google account.
Get the token#
Click Get Verification Token and copy what appears. For Google Analytics and Tag Manager there's no token: click Verify Now and skip the next step.
Place it and verify#
Add the tag, file or record, then click Verify Ownership. When Google confirms it, the panel reads Ownership verified with Google Search Console, and the site moves to Active on Websites.
The Bing Webmaster panel works the same way, with three methods: HTML Meta Tag, XML File (a file named
BingSiteAuth.xml) and CNAME (DNS). Place one, then click Verify Ownership. If you verified the site inside Bing Webmaster Tools yourself, click Already verified this site in Bing Webmaster Tools? Check status instead.Warning
Leave the token in place after you verify. Bing checks it again over time, and removing it can undo the verification.
If connecting fails#
You cancelled, or Google or Bing returned an error. Quillly shows the error and brings you back to the verify step. Click the connect button again.
You signed in with the wrong account. During setup, the panel has no button to switch Google accounts. Verify the domain in the account you connected, using a method above, or connect Bing Webmaster with the account that has it.
Google reports that verification failed. The token isn't live yet. Check that it's on the homepage or in DNS exactly as copied, wait a few minutes for DNS, and click Verify Ownership again.
Verify later#
Click I'll verify later to skip the step. The site stays under Drafts on Websites until you verify, and its website settings page doesn't open. To finish, click Continue Setup on the draft, or Verify acme.com on the last onboarding screen.
Once verified, the site moves to Active, its dot turns green, and its website settings page opens. Quillly's daily Domain Rating check also covers only verified domains.
Common questions#
Do I need to add a DNS record?#
Only if your domain isn't verified in Search Console or Bing yet and you choose the DNS method. If it's already verified there, connecting the account is all it takes.
Do I need both Search Console and Bing?#
No, one is enough to prove you own your domain. Connecting both is still worth it later, because each one submits your sitemaps and reports your search performance for its own engine.
Does verifying put my blog on my domain?#
No. Verifying proves ownership only. To serve Quillly's pages at a path such as /blog, add a reverse proxy rule for that path.
Related#
Getting started: onboarding from sign-in to your first post.
What is Quillly: what runs on your domain and what runs on quillly.com.
Add a website: the three ways to set up a website, and the website settings page.
Serve on your own domain: the next step, serving Quillly's pages at a path on your domain.