Serve on your own domain with a reverse proxy
On this page
- Why you need a reverse proxy
- Paths and targets
- Add the reverse proxy rule
- 1. Open the section's Connection settings
- 2. Pick your stack and copy the rule
- 3. Add the rule to your server and deploy it
- 4. Click Verify Connection
- The rule for each stack
- Nginx
- Caddy
- Apache
- Next.js
- Vercel
- Netlify
- Cloudflare Worker
- PHP / Shared Hosting
- Check that it works
- Change a section's path
- Common questions
- Do I need to proxy /_next/static?
- Does a reverse proxy change my DNS?
- Can two sections use the same path?
- Related
A reverse proxy rule lets a path on your own domain, such as acme.com/blog, serve the pages Quillly renders. This page explains why you need one, gives the rule for your stack, and shows how to check that it works.
Before you start, you need:
A website on your own domain in Quillly, with the domain verified. See Prove you own your domain.
A section set up in Quillly, such as Blog or Docs. See Content types and URLs.
Access to your server or host configuration, or to the code of the site that runs your domain.
Why you need a reverse proxy#
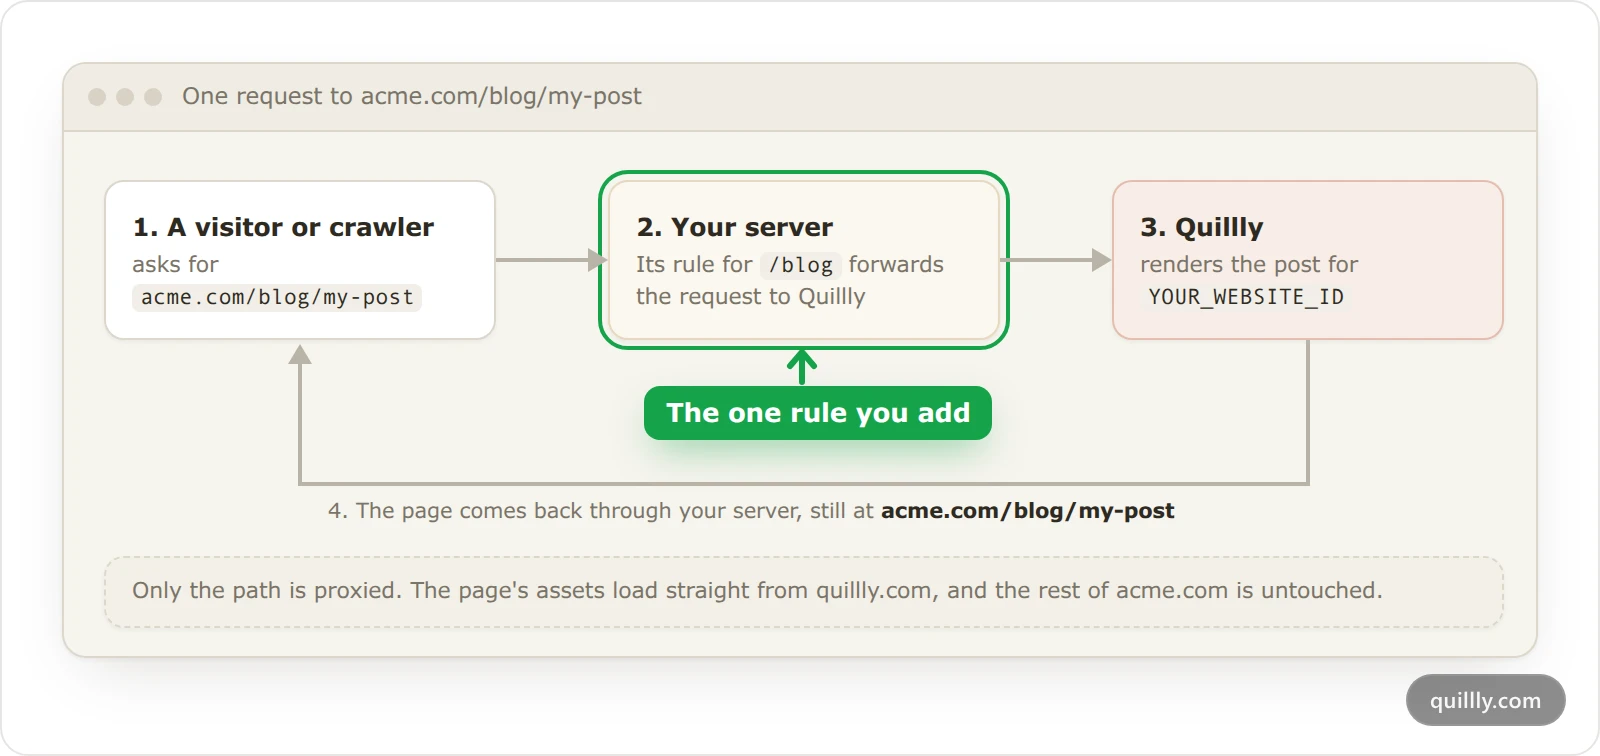
Quillly renders your posts, docs and changelog on its own servers. A reverse proxy is one rule on the server that runs your domain. When someone asks for acme.com/blog/my-post, your server fetches the page from Quillly and answers with it, so the address stays on your domain and search engines credit your domain for the page.
The rule covers only the section's path. There's no DNS change, the rest of your site stays as it is, and the page's assets load straight from quillly.com.
You don't need a reverse proxy when:
your site is on a Quillly subdomain, such as
acme.quillly.com, which Quillly serves directly;a section publishes into another platform, such as WordPress, Ghost, Webflow, Shopify or a webhook, instead of being served by Quillly;
you only want to prove you own the domain or track your existing pages.
Paths and targets#
Each section lives under one path segment on your domain, and each needs its own rule. A path is one segment, such as /docs, not a nested path such as /docs/guide, and two sections can't share a path.
Section | Default path | The rule forwards it to |
|---|---|---|
Blog |
|
|
Docs |
|
|
Changelog |
|
|
News |
|
|
You choose the path when you set up the section, and you can change it later in the section's settings. The dashboard builds each rule with your website's ID and the section's own path, so copy it from there.
Add the reverse proxy rule#
Open the section's Connection settings#
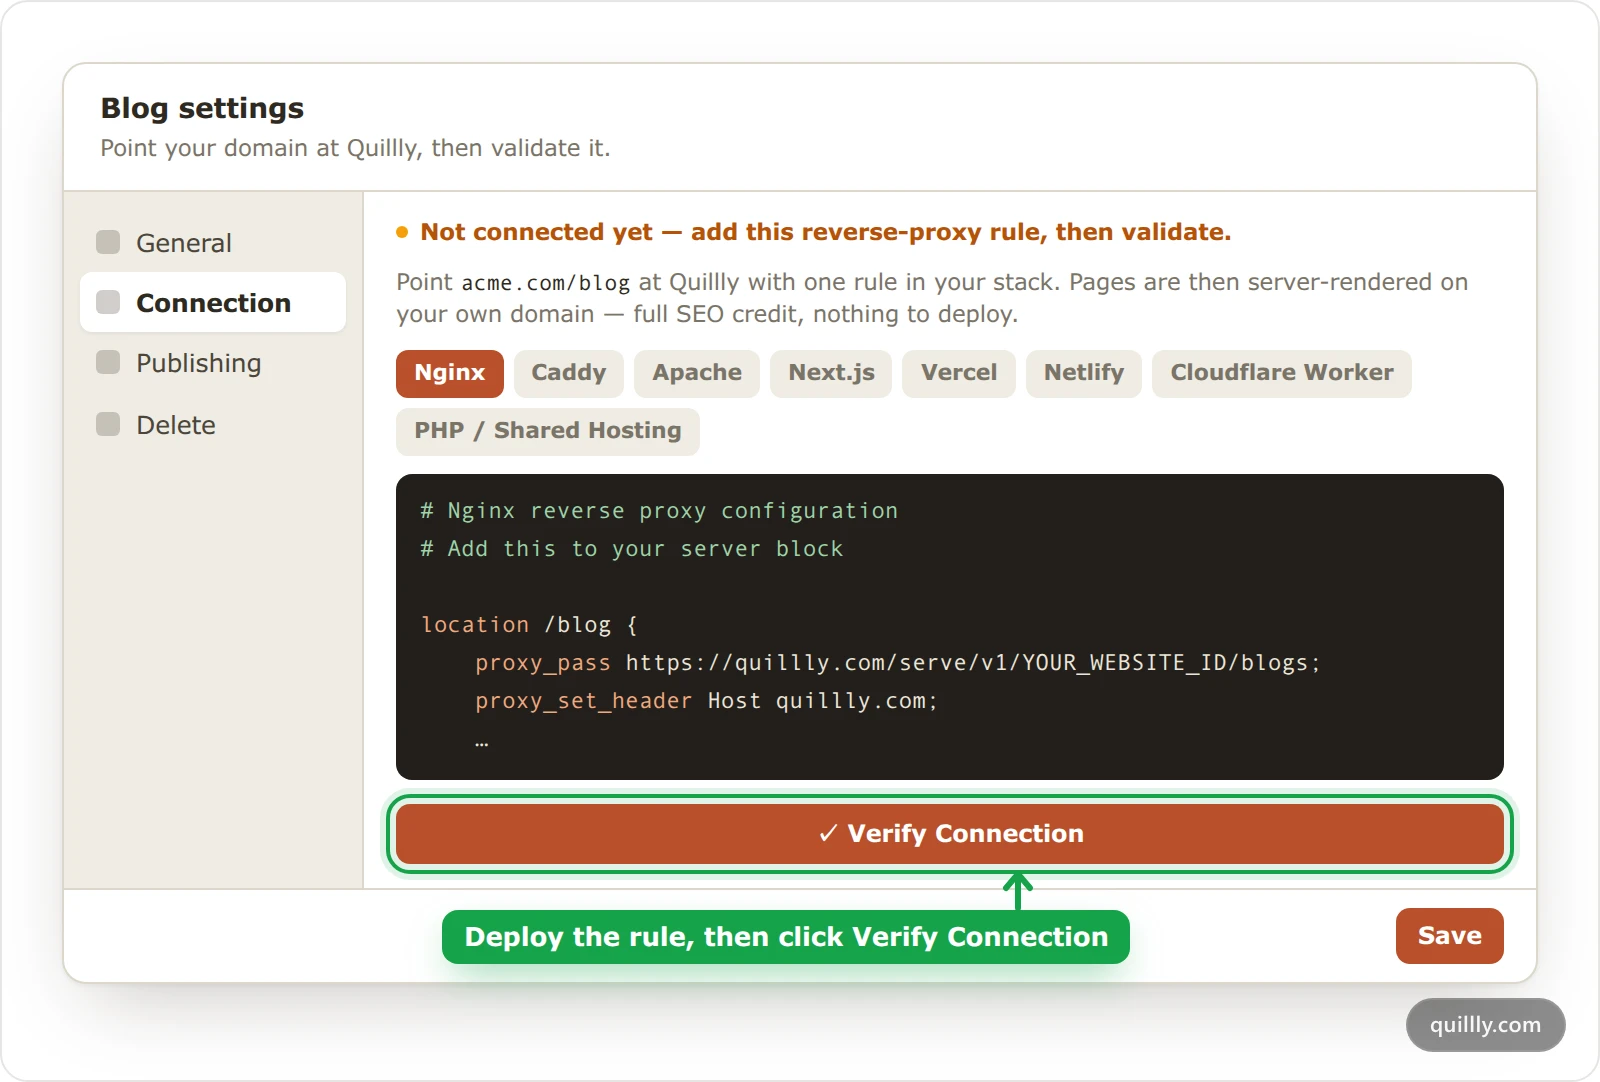
In the Content menu, open the section, such as Blog. A section that isn't serving yet shows Not connected next to its name. Click the gear icon, then Connection.
When you set up a new section with Set up docs or a similar button, the last step, Connect /docs, shows the same rule and button.
Pick your stack and copy the rule#
Click the tab for the software that runs your domain: Nginx, Caddy, Apache, Next.js, Vercel, Netlify, Cloudflare Worker or PHP / Shared Hosting. Then click the copy button on the rule.
Add the rule to your server and deploy it#
Paste the rule where the next section says, then reload your server or deploy your site.
Click Verify Connection#
Back in Quillly, click Verify Connection. When it passes, you see Connection verified!, and the section's badge changes to Connected.
The rule for each stack#
These are the rules the dashboard gives for a blog at /blog. Your copy in the dashboard has your own website ID where these show YOUR_WEBSITE_ID, and your section's own path.
Nginx#
Add it inside the server block for your domain, then reload Nginx. The directives are explained in the Nginx proxy module docs.
# Nginx reverse proxy configuration
# Add this to your server block

location /blog {
    proxy_pass https://quillly.com/serve/v1/YOUR_WEBSITE_ID/blogs;
    proxy_set_header Host quillly.com;
    proxy_set_header X-Real-IP $remote_addr;
    proxy_ssl_server_name on;
}

location /blog/ {
    proxy_pass https://quillly.com/serve/v1/YOUR_WEBSITE_ID/blogs/;
    proxy_set_header Host quillly.com;
    proxy_set_header X-Real-IP $remote_addr;
    proxy_ssl_server_name on;
}

# Note: No need to proxy /_next/static/ — assets are
# loaded directly from quillly.com automatically.Caddy#
Add it inside your site block in the Caddyfile. See Caddy's reverse_proxy directive.
# Caddyfile — add inside your site block

handle_path /blog* {
    rewrite * /serve/v1/YOUR_WEBSITE_ID/blogs{uri}
    reverse_proxy https://quillly.com {
        header_up Host quillly.com
    }
}

# handle_path strips /blog before the rewrite, so
# /blog/my-post resolves to the matching Quillly page.Apache#
Add it to your VirtualHost, or to .htaccess if mod_proxy is on.
# Apache reverse proxy configuration
# Requires: mod_proxy, mod_proxy_http, mod_ssl
# Add this to your VirtualHost or .htaccess (if mod_proxy is enabled)

SSLProxyEngine On
ProxyPreserveHost Off

ProxyPass "/blog" "https://quillly.com/serve/v1/YOUR_WEBSITE_ID/blogs"
ProxyPassReverse "/blog" "https://quillly.com/serve/v1/YOUR_WEBSITE_ID/blogs"

ProxyPass "/blog/" "https://quillly.com/serve/v1/YOUR_WEBSITE_ID/blogs/"
ProxyPassReverse "/blog/" "https://quillly.com/serve/v1/YOUR_WEBSITE_ID/blogs/"

# Note: No need to proxy /_next/static/ — assets are
# loaded directly from quillly.com automatically.
The rule needs mod_proxy, mod_proxy_http and mod_ssl. If your shared hosting doesn't offer them, use the PHP rule instead. See the Apache mod_proxy docs.
Next.js#
Add the rewrites() entries to your next.config.ts or next.config.js, as the Next.js rewrites docs describe.
// next.config.ts (or next.config.js)
// Add this to your Next.js configuration

const nextConfig = {
  async rewrites() {
    return [
      {
        source: '/blog',
        destination: 'https://quillly.com/serve/v1/YOUR_WEBSITE_ID/blogs',
      },
      {
        source: '/blog/:path*',
        destination: 'https://quillly.com/serve/v1/YOUR_WEBSITE_ID/blogs/:path*',
      },
      // No need to proxy /_next/static/ — assets are
      // loaded directly from quillly.com automatically.
    ];
  },
};

module.exports = nextConfig;Vercel#
Put this in vercel.json at your project root. See Vercel rewrites.
// vercel.json — at your project root

{
  "rewrites": [
    {
      "source": "/blog",
      "destination": "https://quillly.com/serve/v1/YOUR_WEBSITE_ID/blogs"
    },
    {
      "source": "/blog/:path*",
      "destination": "https://quillly.com/serve/v1/YOUR_WEBSITE_ID/blogs/:path*"
    }
  ]
}
For a Next.js project on Vercel that already defines rewrites() in next.config, add the rule there instead: vercel.json rewrites and framework rewrites don't merge.
Netlify#
Put this in netlify.toml at your project root. See Netlify rewrites and proxies.
# netlify.toml — at your project root

[[redirects]]
  from = "/blog"
  to = "https://quillly.com/serve/v1/YOUR_WEBSITE_ID/blogs"
  status = 200
  force = true

[[redirects]]
  from = "/blog/*"
  to = "https://quillly.com/serve/v1/YOUR_WEBSITE_ID/blogs/:splat"
  status = 200
  force = true
Cloudflare Worker#
Create a Worker with this code.
// Cloudflare Worker — proxies /blog to Quillly

const PREFIX = '/blog';
const TARGET = 'https://quillly.com/serve/v1/YOUR_WEBSITE_ID/blogs';

export default {
  async fetch(request) {
    const url = new URL(request.url);
    const suffix = url.pathname.slice(PREFIX.length);
    return fetch(TARGET + suffix + url.search, {
      method: request.method,
      headers: request.headers,
      body: request.body,
      redirect: 'manual',
    });
  },
};
Then route requests to it: in Workers & Pages, open your Worker, go to Settings, then Triggers, and add a route for your path, such as acme.com/blog*. Cloudflare explains routes in its Workers routes docs.
PHP / Shared Hosting#
Upload blog-proxy.php to your web root, and add the .htaccess rules from the bottom of the snippet to the .htaccess file in your web root.
<?php
// blog-proxy.php — Place this file in your web root
// Works on any shared hosting with PHP and allow_url_fopen enabled

$websiteId = 'YOUR_WEBSITE_ID';
$slug = isset($_GET['slug']) ? $_GET['slug'] : '';
$page = isset($_GET['page']) ? $_GET['page'] : '';

$path = $slug ? "/$slug" : '';
$query = $page ? "?page=$page" : '';
$url = "https://quillly.com/serve/v1/$websiteId/blogs$path$query";

$context = stream_context_create([
    'http' => [
        'header' => "User-Agent: PHP-Proxy/1.0\r\nHost: quillly.com\r\n",
        'timeout' => 10,
    ],
    'ssl' => ['verify_peer' => true],
]);

$html = @file_get_contents($url, false, $context);

if ($html === false) {
    http_response_code(502);
    echo 'Content temporarily unavailable.';
    exit;
}

// Forward Content-Type header
foreach ($http_response_header as $header) {
    if (stripos($header, 'content-type:') === 0) {
        header($header);
        break;
    }
}

echo $html;
?>

<!-- .htaccess rewrite rules (place in your web root) -->
<!--
RewriteEngine On
RewriteRule ^blog/sitemap\.xml$ /blog-proxy.php?slug=sitemap.xml [L,QSA]
RewriteRule ^blog/([^/]+)$ /blog-proxy.php?slug=$1 [L,QSA]
RewriteRule ^blog/?$ /blog-proxy.php [L,QSA]
-->
Check that it works#
Verify Connection fetches https://acme.com/blog the way a browser does and looks for Quillly's quillly-site tag with your website's ID. If it doesn't find it, the message says why:
Message | What to do |
|---|---|
returned HTTP 404 | Your server isn't routing the path yet. Check that the rule is deployed and matches the path exactly. |
loaded but no Quillly meta tag was found | The path answers with another page. Check the rule's target, and that nothing rewrites the page on its way out. |
points to a different website | The rule has another website's ID. Copy the rule again from this section. |
returned HTTP 5xx, or couldn't reach it | Your server or DNS had an error. Try again in a minute, then check your server's logs. |
Cloudflare is challenging automated requests | Your DNS record is proxied through Cloudflare. Switch it to DNS only (proxy status) while you verify, then switch it back, or add a WAF rule that skips the bot challenge for the path. |
You can check the same thing from a terminal. The first command should answer 200:
curl -I https://acme.com/blogThe second should print Quillly's tag, with your website's ID:
curl -s https://acme.com/blog | grep -o '<meta name="quillly-site"[^>]*>'Warning
Pass pages through unchanged. Every day, Quillly checks the pages it serves on your domain: that the Published with Quillly badge is there (unless your plan lets you hide it), that robots.txt doesn't block the path, and that your domain serves the same page Quillly does. After repeated failures it emails you, and then suspends delivery.
If delivery is suspended, the website settings page shows Blog delivery is suspended. Fix the rule, then click Restore connection. To add analytics tags to these pages, use Tracking Script in website settings rather than your proxy.
Change a section's path#
Change the path in the section's settings under General, then update your rule to the new path and click Verify Connection again. Quillly doesn't redirect the old path, because that path is on your server: add a redirect there if people link to it. Redirects and moving to a new domain covers what Quillly does redirect for you.
Common questions#
Do I need to proxy /_next/static?#
No. The page's assets load straight from quillly.com, so the rule only needs the section's path.
Does a reverse proxy change my DNS?#
No. The rule lives on the server or host that already runs your domain, and your DNS stays as it is.
Can two sections use the same path?#
No. Each section needs its own path, and Quillly refuses a path another section already uses. Pick a different one, such as /help for docs, in the section's settings.
Related#
Getting started: onboarding from sign-in to your first post.
What is Quillly: what runs on your domain and what runs on quillly.com.
Add a website: set up a website on your own domain first.
Content types and URLs: the sections you can serve, and the files each one serves.