Install analytics on your website
On this page
- What the analytics tag does
- Install analytics in three steps
- 1. Copy the tag
- 2. Paste it into the head of every page
- 3. Check that data arrives
- Paste the analytics tag in Next.js, WordPress, Webflow or HTML
- Next.js
- WordPress
- Webflow
- Plain HTML and other sites
- If the card stays on waiting
- Pages Quillly serves need no tag
- Common questions
- Does the tag work in a single-page app?
- Will the tag slow down my site?
- Can one tag cover my subdomains?
- Do I need a cookie banner?
- Related
Install analytics on your website by pasting one script tag into the <head> of every page. When you finish, the install card in Quillly turns green and your first visits start to appear on the Analytics dashboard.
Before you start, you need:
A website in Quillly with the domain your pages run on. Quillly accepts events only from that domain, its subdomains and
localhost. See Add a website.An active plan or trial. Every Quillly plan includes analytics.
Access to your site's code, or to your site builder's custom code settings.
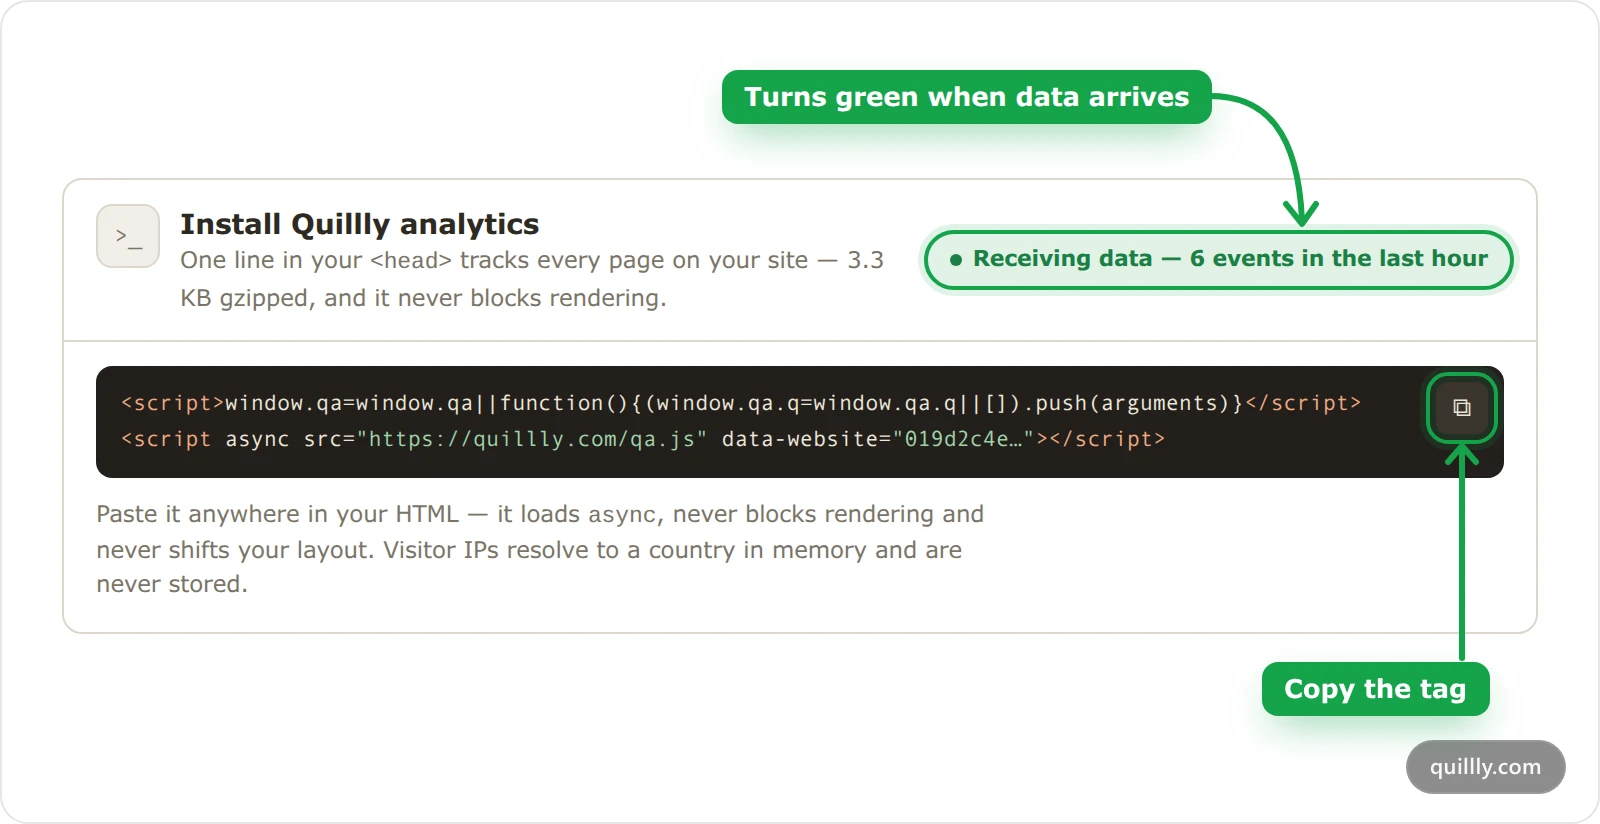
What the analytics tag does#
The analytics tag is two short lines. The first line queues any qa() calls your pages make before the script loads, so none are lost. The second line loads the script, with your website's ID in data-website, one of the attributes the tag reads.
<script>window.qa=window.qa||function(){(window.qa.q=window.qa.q||[]).push(arguments)}</script>
<script async src="https://quillly.com/qa.js" data-website="YOUR_WEBSITE_ID"></script>
The script is about 3.3 KB gzipped and loads with async, so your page never waits for it. It records a page view on every page load, and again whenever the path changes in a single-page app. It also measures how long people stay on each page and how fast the page loads.
Copy the tag from Quillly instead of typing it. The copied tag already carries your website ID.
Install analytics in three steps#
Copy the tag#
Open Analytics under Growth in the sidebar. While your site has sent no events in the last seven days, the page opens with the Install Quillly analytics card. Click the copy button on its dark code block.
If the card isn't there, your site already reports. Click the gear in the page header to open Analytics settings, then copy the tag from the Setup pane.
Paste it into the head of every page#
Paste the tag once, in the template or layout that renders the
<head>of every page, before</head>. The next section shows where that is in Next.js, WordPress, Webflow and plain HTML.The tag you copy follows the Visitor identity setting in Setup. Cookie (the default) loads
/qa.js, and Cookieless loads/qa.cookieless.js. Choose one before you paste, because changing the setting later doesn't change a tag that's already on your site. Cookies or cookieless analytics compares the two.Check that data arrives#
Open your site in a new tab and visit a page or two. Keep Analytics open: the card checks every few seconds and switches from Waiting for your first pageview… to Receiving data when the first events land.
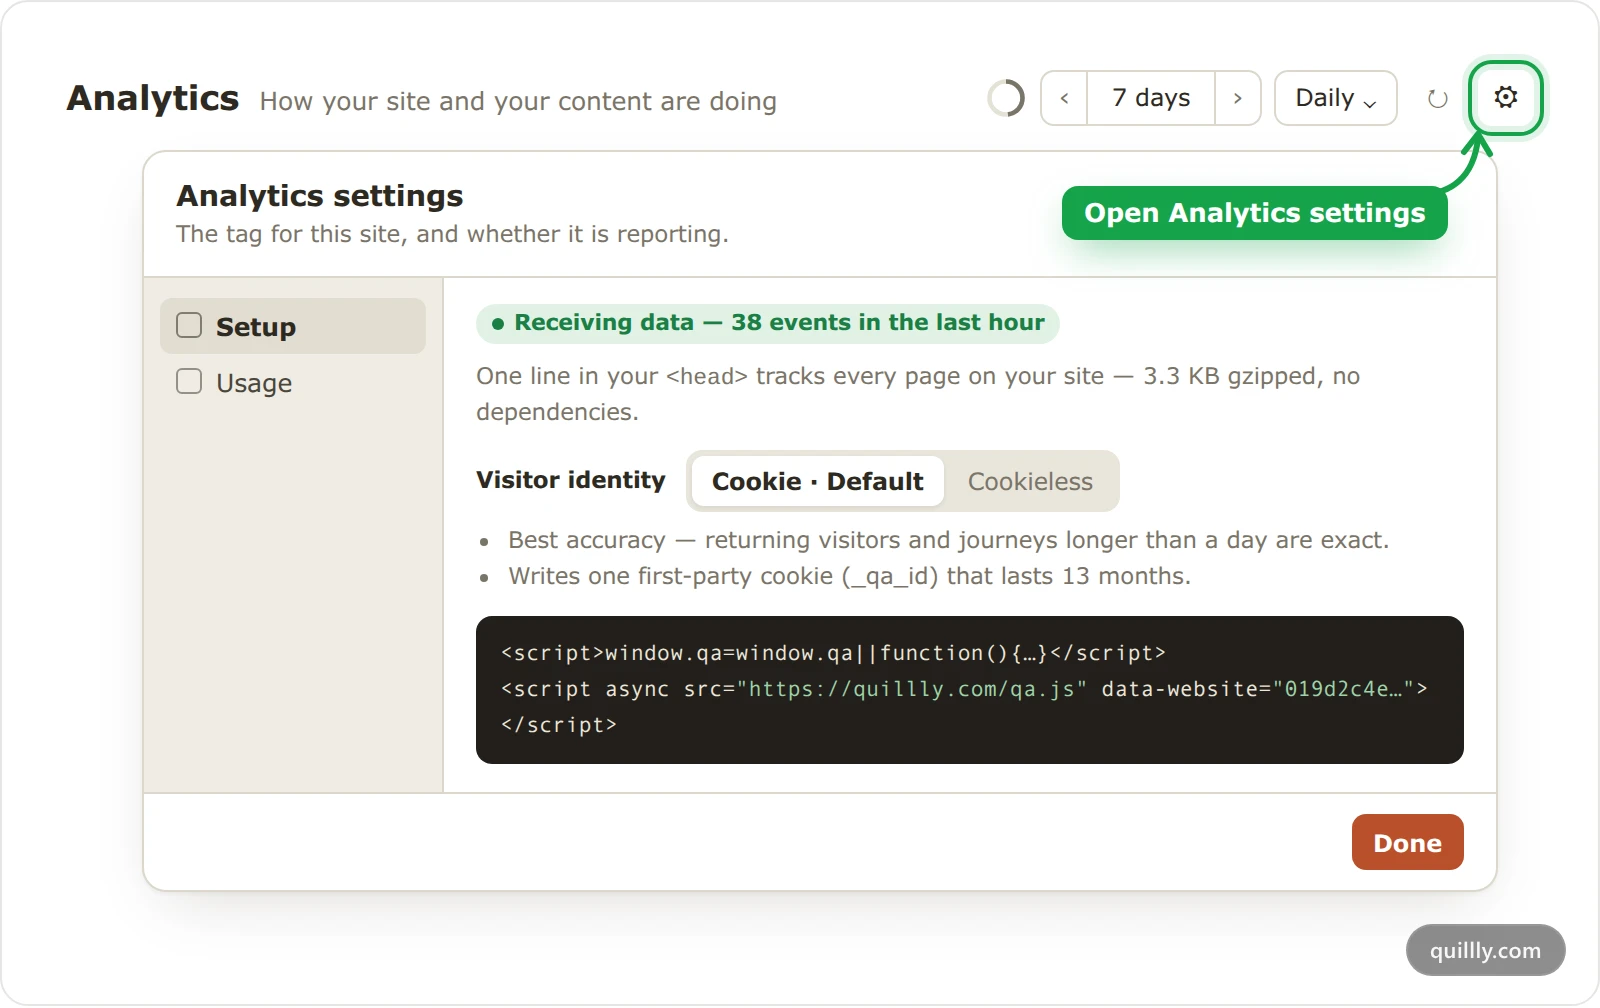
Later, the same status sits in Analytics settings → Setup. Receiving data means an event arrived in the last hour. Tag installed — no events in the last hour means your site reported in the last seven days, but not in the last hour.
Paste the analytics tag in Next.js, WordPress, Webflow or HTML#
However you install analytics, replace YOUR_WEBSITE_ID with the ID from the tag you copied, or paste the copied tag as it is.
Next.js#
In the App Router, add both script tags to the <head> of your root layout, app/layout.tsx. The Next.js guide to layouts shows where the root layout lives.
export default function RootLayout({ children }: { children: React.ReactNode }) {
  return (
    <html lang="en">
      <head>
        <script
          dangerouslySetInnerHTML={{
            __html:
              'window.qa=window.qa||function(){(window.qa.q=window.qa.q||[]).push(arguments)}',
          }}
        />
        <script async src="https://quillly.com/qa.js" data-website="YOUR_WEBSITE_ID" />
      </head>
      <body>{children}</body>
    </html>
  );
}
In the Pages Router, put the same two tags inside <Head> in pages/_document.tsx. Client-side navigation needs no extra code, since the tag follows route changes on its own.
WordPress#
Add the tag with the wp_head action in your child theme's functions.php, so a theme update doesn't remove it. WordPress documents child themes and the wp_head hook in its developer handbook.
add_action('wp_head', function () { ?>
  <script>window.qa=window.qa||function(){(window.qa.q=window.qa.q||[]).push(arguments)}</script>
  <script async src="https://quillly.com/qa.js" data-website="YOUR_WEBSITE_ID"></script>
<?php });
A plugin that adds code to your site's header works too. Paste the whole tag into its header box.
Webflow#
Open your site's Site settings, then the Custom code tab.
Paste the tag into Head code and save.
Publish the site. Custom code runs only on the published site.
Check the result on your own domain, not on the webflow.io address, because Quillly refuses events from domains that aren't yours. Some site builders offer custom code only on paid plans.
Plain HTML and other sites#
Paste the tag before </head> on every page. If your pages share a header file or template, paste it there once. Any other framework works the same way: put the tag in the layout that renders every page's head.
If the card stays on waiting#
Most problems after you install analytics come from one of these.
Test on your own domain. Preview and staging addresses on other domains are refused.
localhostis accepted, so local tests count as visits.Turn off ad blockers. Extensions that block trackers can block the tag. Test in a private window with extensions off.
Check the website ID. The
data-websitevalue must match the ID in the tag you copied.Allow Quillly in your Content Security Policy. If your site sends a Content-Security-Policy header, add
https://quillly.comtoscript-srcandconnect-src.Use a real browser. Quillly drops visits from headless browsers and known bots.
Check your plan. Collection stops when a trial or plan ends, and pauses when you use your events for the billing period. Analytics limits, retention and excluding traffic explains the allowance.
Pages Quillly serves need no tag#
The blog, docs, changelog and news pages Quillly serves for you already carry the tag, on your own domain or on your Quillly subdomain. Their events never count toward your plan's event allowance. Install analytics for the rest of your site: your home page, your pricing page and anything else you host yourself.
To add another tool, such as Google Analytics, to the pages Quillly serves, see Tracking scripts on served pages.
Common questions#
Does the tag work in a single-page app?#
Yes. It records a new page view whenever the path changes, including links your router handles and the back and forward buttons. A change to only the query string or the #hash doesn't count as a new page.
Will the tag slow down my site?#
The script is about 3.3 KB gzipped and loads with async, so the page never waits for it. It also groups events into small batches instead of sending one request per event.
Can one tag cover my subdomains?#
Yes. Quillly accepts events from your website's domain and every subdomain of it, such as app.acme.com for acme.com. All of them report into the same website.
Do I need a cookie banner?#
The default tag writes one first-party cookie, _qa_id, and the cookieless tag writes no cookie. Whether your site needs a consent banner depends on your site and your visitors' countries, so that decision is yours.
Related#
Cookies or cookieless analytics: choose how Quillly counts visitors.
Read the Analytics dashboard: what each number means once data arrives.
Track goals and conversions: count signups, purchases and other actions.
Analytics limits, retention and excluding traffic: the event allowance and
data-qa-exclude.Tracking scripts on served pages: add other tools to the pages Quillly serves.
Add a website: set the domain your tag reports from.