
Your marketing site looks great on Webflow. Your blog is where things fall apart.
You draft a post in ChatGPT or Claude. Then you copy it out, paste it into a Webflow CMS item, fix the formatting Webflow mangled, re-add the links, set the slug, pick a category, upload the image, and hit publish. Fifteen minutes per post, every post. Multiply that across a content calendar and you've built a part-time job out of pasting.
There's a faster way. To publish to Webflow from AI without copy-paste, you connect your AI to Webflow's CMS through its Data API (or the official Webflow MCP server) so the AI creates and publishes the post directly. Or you skip Webflow's CMS for the blog and publish to a /blog subdirectory on your own domain instead.
This guide covers both paths, with real code and the SEO tradeoffs. As of mid-2026, 85% of marketers use AI to create content, and AI trims about three hours off each piece. Most of that saving disappears at the last step: getting the post live. That step is finally automatable. Here's how.
The copy-paste tax nobody puts on the invoice#
The manual loop looks harmless until you count it. Every AI-written post you move into Webflow by hand runs through the same eight steps, and each one is a place to lose a link, break formatting, or forget a canonical tag.
Draft the post in your AI tool
Copy it out of the chat
Paste it into a new CMS item
Reformat the rich text Webflow rewrote
Re-add internal and external links
Set the slug, category, and meta fields
Upload and place the featured image
Publish and re-check the live page
AI saves roughly three hours per piece of content, but the paste step quietly claws a chunk of that back. Publish five posts a week and you're spending well over an hour just moving text between two tabs. That's around 85 hours a year of pure mechanical work.
The real cost isn't the hour. It's the posts you never ship because the friction wins. Content velocity dies at the paste step, and velocity is what builds topical authority. If you already run an AI content engine in Claude Code, the writing is cheap. The publishing is the bottleneck.
Two ways to publish to Webflow from AI#
There are exactly two clean ways to get AI-written content onto your Webflow domain without copy-paste. Pick based on where you want the blog to live.
Path 1 publishes into the Webflow CMS using Webflow's Data API or its official MCP server. Your AI creates a CMS item and publishes it. The post lives inside Webflow.
Path 2 leaves Webflow's CMS out of the blog entirely. You keep Webflow for your marketing site and run the blog at yourdomain.com/blog through a reverse proxy, published by a separate AI-connected layer.
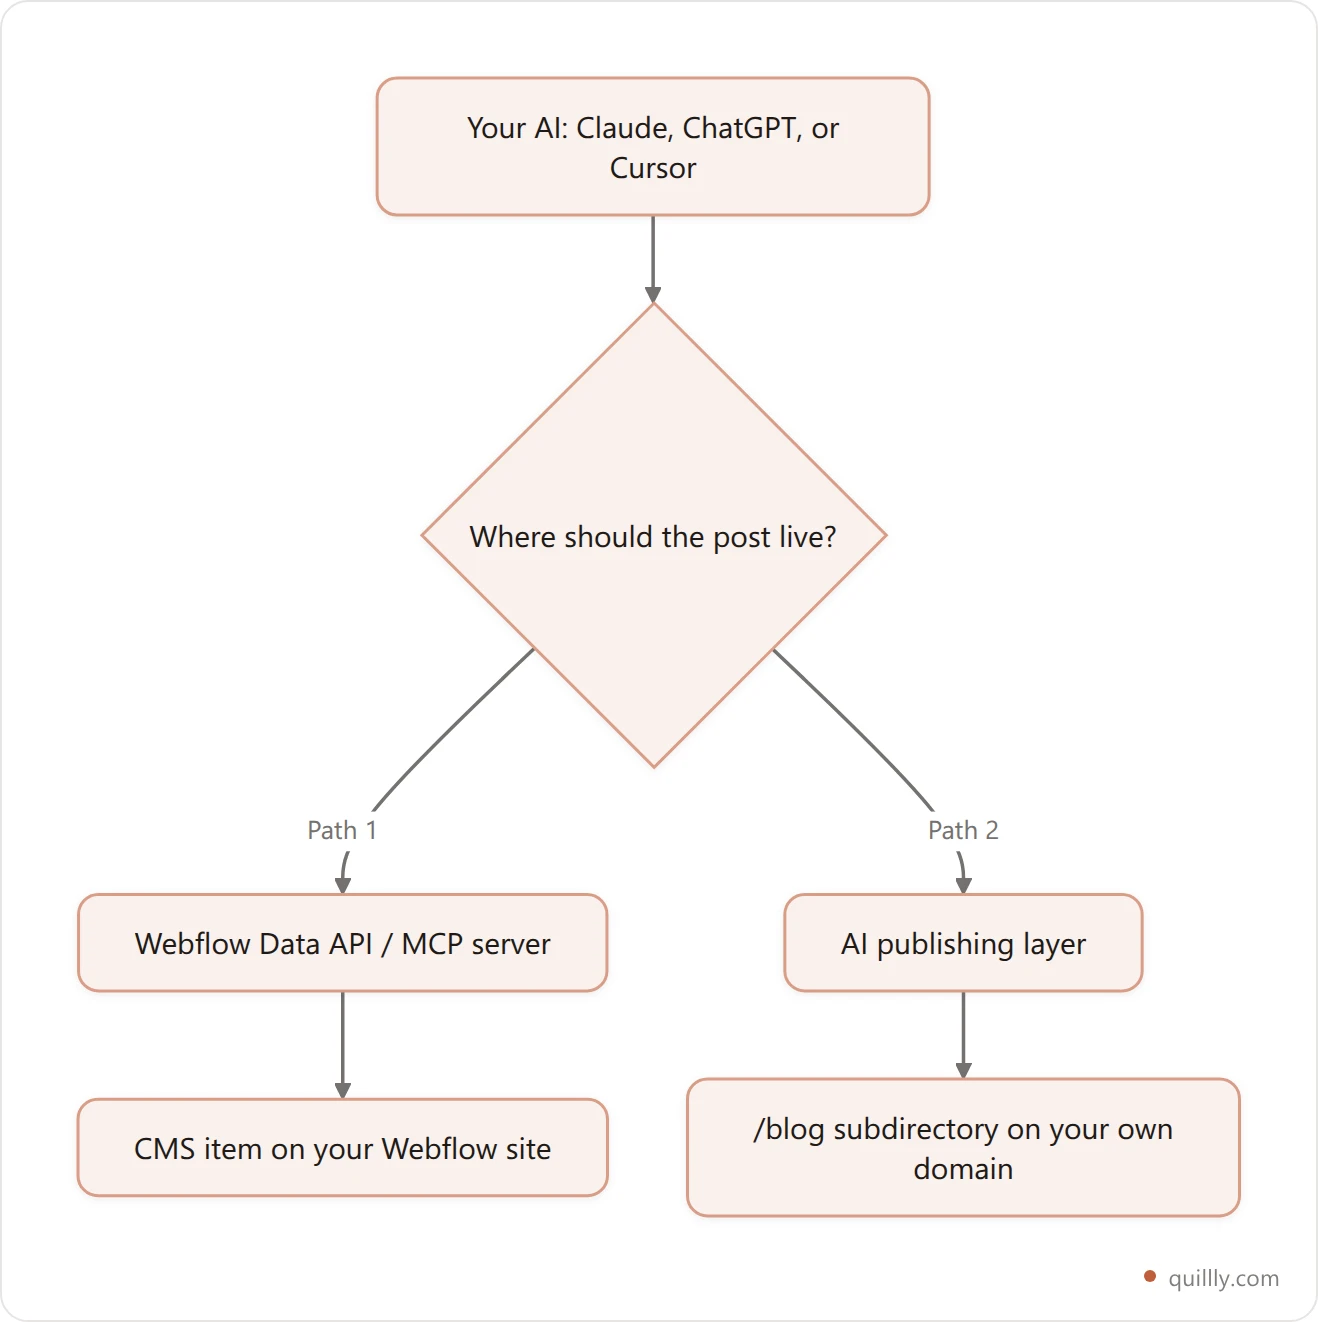
Here's how the two paths compare on the things that actually matter.
Factor | Path 1: Webflow CMS | Path 2: /blog subdirectory |
|---|---|---|
Where content lives | Inside Webflow | On your own domain |
Publishing method | Data API / Webflow MCP | Reverse proxy + AI layer |
Counts against CMS item limit | Yes | No |
Rich-text quirks | Webflow's editor | Plain markdown |
Best for | Small blogs already on Webflow | Volume publishing and SEO |
Path 1: Publish into the Webflow CMS with the Data API#
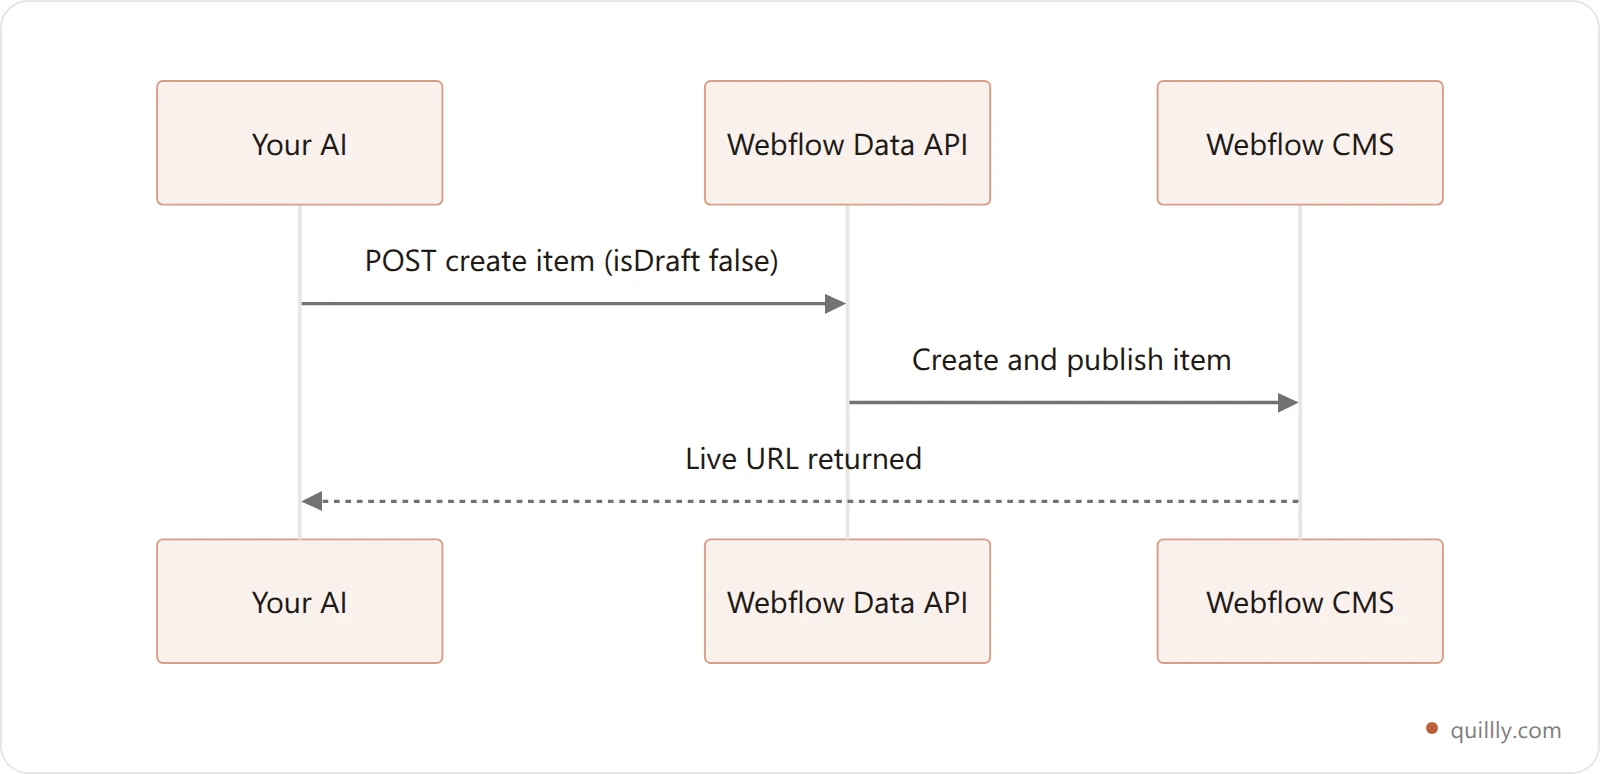
Webflow's Data API (v2) is the official way to create, update, and publish CMS content programmatically. Anything a script can do, your AI can do through it. No dashboard, no pasting.
Start with the model. A CMS Collection is a content type, like "Blog Posts." Each item is one post, with fields mapped to your design: name, slug, rich-text body, featured image, date, and references. Your AI fills those fields and creates the item.
You'll need an API token with three scopes: cms:read, cms:write, and sites:publish. The last one matters. Without it you can create drafts but not push them live.
The key detail is the isDraft flag. Create an item with isDraft: false and it publishes on creation. Set isDraft: true and it stages as a draft for review. Here's a live create:
curl -X POST "https://api.webflow.com/v2/collections/{collection_id}/items/live" \
  -H "Authorization: Bearer $WEBFLOW_TOKEN" \
  -H "Content-Type: application/json" \
  -d '{
    "isArchived": false,
    "isDraft": false,
    "fieldData": {
      "name": "Publish to Webflow From AI",
      "slug": "publish-to-webflow-from-ai",
      "post-body": "<p>Your AI-written HTML goes here.</p>"
    }
  }'
Mind the rate limits. The Data API allows 60 requests per minute on lower plans and around 120 on higher ones. Site publishes are capped at one successful publish per minute. Go over and you get a 429 with a Retry-After header. For a human-paced blog that's invisible. For bulk programmatic publishing, it's a ceiling to plan around.
The official Webflow MCP server#
Writing raw API calls is fine, but you don't have to. Webflow ships an official MCP server that connects AI agents directly to the Data API. Model Context Protocol is the open standard that lets tools like Claude, ChatGPT, and Cursor call external services in a structured way.
With the Webflow MCP server connected, you tell your AI "create and publish this post to my Blog Posts collection" and it makes the API calls for you, inside the chat you already use. A config entry looks like this:
{
  "mcpServers": {
    "webflow": {
      "command": "npx",
      "args": ["-y", "webflow-mcp-server"],
      "env": { "WEBFLOW_TOKEN": "your_api_token" }
    }
  }
}
The catch with Path 1 is structural, not technical. Every post still lives inside Webflow's CMS, on Webflow's URL structure, and counts against your CMS item limit. For a lot of teams that's fine. For anyone publishing at volume or chasing SEO, Path 2 is worth a hard look.

Path 2: Skip the CMS and publish to a /blog subdirectory#
Here's the move most Webflow guides miss. Your blog does not have to live inside Webflow. You keep the marketing site exactly where it is and run the blog at yourdomain.com/blog through a reverse proxy, published by an AI-connected layer that writes straight to markdown.
Why bother? Two reasons. First, Webflow allows one project per domain unless you're on Enterprise, so a separate blog needs a reverse proxy to appear on the same domain. Second, and bigger, a subdirectory beats a subdomain for SEO. Webflow's native pattern often pushes blogs onto blog.yourdomain.com, which splits your authority.
This is exactly where a publishing layer like Quillly fits. Your AI writes the post, Quillly scores it against its SEO criteria, and publish_content pushes it live to /blog on your domain. No CMS item, no reformatting, no paste. It's the same idea behind publishing a blog to a subdirectory with a reverse proxy, applied to a Webflow front end. If you're weighing the migration, the guide on moving your blog to your own domain without losing SEO covers the redirect mechanics.
Subdirectory vs subdomain: the SEO that actually moves numbers#
This isn't a theoretical debate. The case studies are brutal and consistent.
"Google Web Search is fine with using either subdomains or subdirectories... I'd personally try to keep things together as much as possible." — John Mueller, Google Search Advocate (Search Engine Journal)
Google says it can handle both. Real migrations say otherwise. When PinkCakeBox moved its blog from a subdomain to a subdirectory, organic traffic rose about 40%. Buffer roughly doubled its organic traffic over six months doing the same consolidation. And IWantMyName went the other way, subdirectory to subdomain, and lost around 47% of its traffic (ButterCMS).

The pattern is one-directional. Content on a subdirectory inherits the domain's full authority. Content on a subdomain has to earn its own. For a blog whose entire job is to build authority, that's the difference between compounding and starting over.
Subdomain (blog.site.com) | Subdirectory (site.com/blog) | |
|---|---|---|
Link equity | Partly separate | Shared with root |
Authority build-up | Slower | Compounds faster |
Webflow default | Common | Needs reverse proxy |
Observed traffic trend | Flat to negative | +40% to 2x in case studies |
The No-Paste Publishing Loop#
Whichever path you pick, the workflow that keeps content moving is the same four-phase loop. Call it the No-Paste Publishing Loop. It replaces the copy-paste job with a cycle your AI can run end to end.

Draft. Your AI writes the post from a brief, in markdown, links and headings included.
Score. Before anything goes live, the draft is checked against real SEO criteria: heading structure, internal links, meta tags, readability, and schema. This is the review gate that separates a content engine from an autoblog spam cannon.
Publish. The scored post goes live on your domain in one call. No dashboard round-trip.
Index. The new URL is submitted for indexing so search engines and AI crawlers find it fast, then the loop starts again on the next brief.
The point of naming the loop is repeatability. Once the four phases run without a human touching a CMS field, publishing stops being the constraint. You can run the same loop to publish to WordPress from AI or publish to Ghost from AI. The front end changes; the loop doesn't.
Webflow CMS limits that bite at scale#
If you go with Path 1, know the ceilings before you hit them. Webflow's CMS has hard item and collection caps, and they're built for designed sites, not high-volume blogs.
Historically the CMS plan capped out around 2,000 items and 20 collections, with higher tiers reaching 10,000. Webflow's May 2026 plan consolidation merged CMS and Business into a single Premium plan with a much larger allowance, roughly 20,000 items and 40 collections (Webflow pricing). Generous, but still finite, and every AI-published post counts against it.
Then there's the publish rate limit: one successful site publish per minute. For a founder shipping a few posts a week, irrelevant. For programmatic publishing across many pages, it's a real throttle you design around.
Here's the contrarian part. If your plan is to publish at genuine volume, Webflow's CMS is the wrong home for your blog. It's a superb visual builder for a marketing site. It was never meant to be a content warehouse. That's the whole case for keeping the blog on a subdirectory outside the CMS, where item counts and publish throttles simply don't apply.
Make AI-published content actually get cited#
Getting the post live is half the job. The other half is getting it seen, and in 2026 "seen" increasingly means cited by ChatGPT, Perplexity, and Google's AI Overviews, not just ranked.
The stakes are real. When an AI Overview shows for a query, the average organic click-through rate drops from about 1.41% to 0.64%, a 54% fall. If you're not in the answer, you're not in the traffic.

So structure for the machines. Three levers move the needle most:
Front-load the answer. About 44% of ChatGPT citations come from the first third of a page. Put the direct answer near the top.
Add FAQ schema. Pages with FAQ schema are roughly three times more likely to be cited by AI answer engines.
Keep it fresh. Content updated within 30 days earns about 3.2x more AI citations than content older than 90 days.
"Target and focus more on answering the long-tail queries of your users. We are going to see a much bigger and more important impact from those as a consequence of the AI overviews and personalised AI results." — Aleyda Solis, SEO consultant (Majestic)
None of that requires new writing. It requires publishing content that's already structured for answers and easy to refresh, which is far simpler when your posts are portable markdown, not locked in a CMS. For the deeper playbook, see how to get cited in Google AI Mode and how to get cited in Perplexity.
A prompt you can steal to publish your next post#
Here's a copy-paste-free starter. Connect your AI to Webflow's MCP server (Path 1) or an SEO publishing layer (Path 2), then hand it a brief like this:
You have access to my publishing tools. Do this end to end:

1. Draft a 1,500-word post titled "<your title>" targeting the
   keyword "<your keyword>". Markdown. One H1, seven H2s, a
   direct-answer paragraph up top, and a 6-question FAQ.
2. Add 3 internal links to my existing posts and 3 external
   links to authoritative sources.
3. Score it for SEO. If the score is under 85, fix the flagged
   issues and re-score until it passes.
4. Publish it and return the live URL.

Do not ask me to copy or paste anything.
That single instruction runs the entire No-Paste Publishing Loop. The AI drafts, scores, fixes, and publishes while you review the final URL. Save the prompt, swap the title and keyword, and it becomes your publishing template for every future post.
Frequently asked questions#
Can you publish to Webflow from ChatGPT or Claude automatically? Yes. Connect ChatGPT, Claude, or Cursor to Webflow's official MCP server, which wraps the Data API. Once connected, the AI creates and publishes CMS items directly from your chat, with no copy-paste. You can also skip the CMS and publish to a /blog subdirectory on your domain through a separate AI-connected publishing layer.
Does Webflow have an API for publishing blog posts? Yes. The Webflow Data API (v2) lets you create, update, and publish CMS items programmatically. Creating an item with isDraft: false publishes it immediately, while isDraft: true stages it as a draft. You need a token with cms:read, cms:write, and sites:publish scopes to publish live.
What is the Webflow CMS item limit? It depends on the plan. Older CMS plans capped around 2,000 items and 20 collections. After Webflow's May 2026 plan changes, the Premium plan raised the ceiling to roughly 20,000 items and 40 collections. Every post, including AI-published ones, counts toward that limit, which matters for high-volume publishing.
Is a subdirectory or a subdomain better for SEO? A subdirectory is generally better. Content on site.com/blog shares the root domain's authority, while a subdomain like blog.site.com has to build its own. Real migrations back this up: one site gained about 40% organic traffic moving to a subdirectory, and another lost roughly 47% moving the other way.
Can I host my blog at example.com/blog on Webflow? Within a single Webflow project, yes, using a CMS collection page at a folder path. Hosting a separate blog at /blog on the same domain requires a reverse proxy, because Webflow allows one project per domain outside Enterprise. Tools like Cloudflare Workers or a dedicated publishing layer handle the proxy.
Do AI-written blog posts hurt Webflow SEO? Not on their own. Google rewards helpful, well-structured content regardless of how it was drafted, and penalizes thin, unedited spam. The risk isn't AI; it's publishing at volume without a review step. A workflow that scores each post before it goes live keeps AI content on the right side of that line.
What is a Webflow MCP server? An MCP server is a bridge that lets AI tools call an external service in a structured way. Webflow's official MCP server connects Claude, ChatGPT, or Cursor to the Webflow Data API, so the AI can read collections and create or publish CMS items directly from a chat, without you touching the dashboard.
How do I avoid copy-pasting content into the Webflow CMS? Automate the last step. Either connect your AI to Webflow's Data API or MCP server so it creates items directly, or publish to a /blog subdirectory on your domain through an AI-connected layer that writes markdown. Both remove the manual paste-and-reformat loop entirely.
The bottom line#
Publishing is the last mile that quietly kills content velocity, and it's the easiest part to automate now. Three things to take away:
You have two clean paths to publish to Webflow from AI: into the CMS via the Data API or MCP server, or onto a
/blogsubdirectory that keeps your marketing site on Webflow.Subdirectory beats subdomain, and the gap is large. Case studies show swings of +40% to 2x in one direction and about -47% in the other.
Structure for AI search or lose the clicks. Organic CTR falls roughly 54% when an AI Overview appears, so front-load answers, add FAQ schema, and keep content fresh.
Want your AI to actually publish the post it just wrote, score it, and put it live on your own domain? Connect Quillly to Claude, ChatGPT, or Cursor in 30 seconds.


